Showing posts with label Recipes. Show all posts

Saturday, July 4, 2015

Recipe: QT's Low-Sugar Plum Jelly - Step II: Jelly!

***UPDATE*** Added 7/7/15 - Clarification on quantities!

Hey!  Making good on my promise!

This is actually the EASY part - and I actually don't have many pictures to go along with it (Oops!)

So for this step, you start with the plum juice you made earlier.  Give it a taste and, well, this part is a Judgement Call.  See, the juice will be pretty tart, so we'll be throwing in a lot more sweetener than I'm accustomed to using.  What you want to figure out is kinda/sorta the "depth" of the flavor and color.

If it's too watery/weak, you're gonna want to simmer it down to a lesser quantity which means more flavor.  Makes sense?

Honestly, I don't think I can give you a specific, fancy-scientifical, 100% accurate gauge to work with.  But here's what I ended up with:

  • 1st batch: 5lbs fruit + I-don't-remember how much water, ended up at 12 cups of weak/watery juice.

    I simmered it down by 1/3 to roughly 8 cups (2 batches of jelly).
  • 2nd and 3rd batches 5lbs fruit + 10 cups water (each - then I combined 'em).  I ended up with a total of 17+ (ish) cups of more-condensed juice.

    Simmered it down by appx 1/4 to end up with roughly 14-16 cups (3 batches of jelly)
  • I'm thinkin' the roughly-optimal ratio would end up being 5 lbs fruit, 10 cups water, then simmer down to ~8 cups = ~2 batches of jelly.
So yeah.  Kind of a Judgement Call, right?  I think - to keep it simple - I'm gonna go with the 2nd batch's numbers with the caveat that YMMV.  It's merely a guideline!

QT's Low-Sugar Plum Jelly - Made in TWO batches
The quantities listed below are for ONE batch of jam
Yield 8(ish) half-pint jars of jam (each batch is appx 4 half-pints - give or take!)

Ingredients:
  • 4 cups of already simmered-down/condensed plum juice
  • 2 cups granulated sugar
  • 2 cups granulated Splenda (or whatever sweetener you choose - I tend to think that Stevia might be too bitter, but that's just me)
  • 1 TBS lemon juice
  • 5 TBS Low/No-Sugar Pectin (I use this)
Instructions:
  1. Heat the plum and lemon juices in a dutch oven til it reaches a light boil/simmer
  2. Stir in the Splenda (helps to use a whisk, actually - so it doesn't clump)
  3. Mix the sugar and Pectin together with a fork in a dry bowl.
  4. Slowly add the sugar + pectin to the juices, stirring all the while (again, we don't want clumps)
  5. Increase heat to High or Medium-High, stirring constantly  
  6. Bring it to a rapid boil, stir-stir-stir (and keep a close watch on your temp - it will try to boil-over!).  Boil hard for one full minute, stirring constantly, and remove from heat. 
  7. Check for "set" (spoonful of jelly on a spoon, in the fridge for a minute or two).
  8. Remove the bubbly scummy stuff from the top (I set it aside to mix with plain yogurt - yum!)
  9. Transfer to hot, sterilized canning jars.  Wipe the rims, apply the lids.
  10. Process in a water-bath for 10 minutes
  11. Leave jars undisturbed for 24 hours.  Check the seals (lids that pop up and down in the center are not sealed - put those in the fridge and use them first).
 My first batch didn't "set" completely - but it's still delicious.  Firms up in the fridge, but it can also be used as waffle syrup (Ooh!  Or on ice cream!).  Later batches had more Pectin and set-up better.

It really is delicious!  I used a lot more sweetener in this than I normally do - but it still managed to retain it's fruitiness.  SUPER pleased with this recipe!

And see how it gleams?!

Sparkling like a ruby in the afternoon sun!

Final update 7/7/2015: I used the very-last of the plums to make one more big batch o' jelly.  Did the 5lbs to 10 cups ratio.  I actually ended up with just-shy of 8 cups of juice - so I didn't need to cook it down any further.  I suspect much has to do with the ripeness of the fruit (and this fruit was super-ripe - almost over-ripe!).

I ended up making 2 batches of jam (appx 3-1/2 cups juice, 3-1/2c Splenda/Sugar, 1T Lemon juice, 5T Pectin), and I ended up with 10 half-pints of jelly.

This definitely ain't a science!

Recipe: QT's Plum Jelly - Step I: Juice

Thanks for dealing with my last Super-Rambly post - but I had to buy some time so I could go back and re-make the Jelly Recipe - this time actually *paying attention* to what the hell I was doing!

Gawd knows, I had enough plums!

Round VII
(June 30 - the last of the plums)

Okay, I'm not gonna lie - this recipe is pretty time-consuming to make, but its' not SUPER Hands-on, which is why I like it (and it's now getting added to my "Make-Every-Year" list).  

I am just SO DONE with blanching, peeling and pitting plums!

So yeah, no blanching/peeling/pitting required - but it does end up taking two days to make.  Butttt:  If you've got enough plums (Me!  I do!) and time (Yay! Telecommuting!) you can make massive "batches" and crank-out gallons of jelly with (comparatively) minimal effort.

I've never made jelly before.  I kinda/sorta already knew this but the difference between Jam and Jelly is: Jam is basically made from whole fruit (and there are variants from that: Compotes and Confits and Preserves - go here if you want an education!), whereas Jelly is made just from the juice (My interpretation) (Serious Eats says it's jam that's been strained for clarity) (Wikipedia seems to agree with both of us!).  

So in order to make Plum Jelly, first one must make Plum Juice.  Google sent me to this site, which has really good instructions - and videos - on how to accomplish this feat.  

The first time I made juice, I didn't really pay attention to quantities so much, and my juice ended up way too watery and needed a lot of cooking-down.  In any event, I'll do a pictorial first (and the pics are a mish-mosh of 1st Attempt/2nd Attempt!), I'll list the final quantities/ratios in Recipe-Style at the end, k?!

Day #1 - Juice the Plums

First up, it helps to do this in a ginormous stock-pot (especially if you're gonna do BIG batches) - preferably stainless steel.  Even for the smaller batches (@ 5 lbs of plums) I felt safer using the giant pot - in case of boilovers  

So start out with 5 lbs of ripe plums - the riper the better (ripe/squishy plums are sweetest - but avoid the overripe mushy ones).  If you see any nasty-bits, cut 'em off.  Other than that, just rinse 'em, de-stem 'em, and pop 'em into the stock pot.  Then add water to "almost-cover" them.  I found that 5 lbs of plums worked best with 10 cups of water.

This was more than 10 cups of water

Heat up the plums on Medium-High, stirring frequently.  They'll start to peel themselves in a few minutes.  Like thus:

Continue to heat - with occasional stirring (you don't want anything burning/sticking to the bottom of the pot).  Things should start to break-down nicely, and the water should turn a pretty pinky color:

Although, with the 5# fruit to 10c water, it should be a bit darker.

Once it starts to boil, turn the heat down to simmer and let 'er rip for approx 30-45 minutes (again, poke a spoon in there periodically).  Let it simmer/bubble down 'til the fruit is a gushy slurry:

Photos aren't super-clear since there was steam coming off the slurry

Just for comparison - here is a pic of the slurry with the 5#/10c Ratio
It actually is a deeper, richer color.

Note: If you are impatient (I was, during Batch #3 of juice-making!), you can kind of hasten things along by squishing the smushy fruit up against the side of the pot, or use a potato-masher.  Although doing so results in a bit less juice in the end...

Anyway, once gushy-smushy-slurry is achieved, turn off the heat and pop a lid on the pot.  Let it cool slowly...

Next comes the messy "Hands-On" part (so now would be a good time to change out of that nice clean white shirt!): Straining the slurry into juice.  I'm guessing there are proper tools for this process.  This comes to mind!  I didn't have a proper jelly-strainer bag.  Instead, I had a fine-mesh strainer bag (for soaking hop/grains for beer-making).  

Basically, I constructed the Rube Goldberg equivalent of a Jelly-Strainer by using a cheesecloth-lined deep-fryer basket, with the slurry-filled strainer-bag in a colander, balanced on top of a dutch-oven with a couple of wooden spoons!

Yeah.  Like that!
(Cheesecloth was totally unnecessary, BTW!)

So basically you ladle the (cooled) slurry and juice into the strainer bag and let it drip slowly into the dutch oven.  This can take an hour or two (or more).  If you're a real stickler for super-clear jelly, let it take it's sweet time.  If you have fruit flies in the vicinity, cover the whole mess - loosely - with a towel.  I'm not a stickler for super-clear jelly so after about an hour-and-a-half, I picked up the bag and gave it several good squeezes to get as much of the juicy-stuff out of the bag.  Since the bag is fine-mesh, it really didn't let any of the pulp get through (but my final jelly was *not* crystal clear, either).

You may or may not want to filter it, again, through coffee filters.  Whatever floats your boat.  I was fine with it, so I covered the pot of juice and stuck it in the fridge overnight.

Okay, notes on Plum:Water Ratios:  

  • Juice-batch #1 was 5# of plums and I-didn't-measure-how-much water.
    I ended up with 12 cups of 'watery' juice.
  • Batch #2 was 5# of plums to 10 cups of water.
    I let it simmer/slurry on it's own and ended up with 9 cups of juice.
  • Batch #3 was 5# to 10 cups.
    I got impatient and mashed-em as they cooked and ended up with 8 cups of juice.
This is the end-result of Batch#1 (12 cups - prior to cooking-down):

You can see it's a kind of pale color.
Later batches were actually quite a bit darker.

Note: I am *not* posting a picture of the drained slurry-n-pits that I had to scrape out of the mesh-bag when it was all done.  Suffice it to say, it looked disgusting!

"You're Welcome!" ;-)

Okay, this seems like a pretty-good stopping point.  I'll move onto the actual Jelly-Making in my next post.

(Really?  Yeah.  Really!)

Summary:

QT's Plum Juice for Jelly-Making
Ultimately yields 1 - 1-1/2 batches of jelly (appx 8 half-pints)

Ingredients
  • 5 lbs fresh ripe plums, washed and de-stemmed
  • 10 cups water
Instructions
  1. Place the plums in the bottom of a very large stock-pot (mine holds 20 quarts)
  2. Cover the plums with water
  3. Heat the plums on Medium-high, stirring frequently 'til the plums start to de-skin themselves
  4. Continue to cook 'til the pot starts to boil.  
  5. Reduce heat to simmer and let it cook (stirring occasionally) til everything is reduced to a slurry
  6. Ladle the slurry into a fine strainer and let it drip slowly into a bowl (or dutch oven - basically anything big enough to accommodate ~8-10 cups of juice).  Let it drip for several hours or overnight.
  7. Refrigerate juice for Jelly-Making tomorrow!
Okay, stay tuned for more!


Sunday, May 10, 2015

REC: Garlic Ranch Dressing Mix - aka A Happy Accident!


Just a quickie - but I want to document it ~ before I forget it!

In my never-ending quest to be the World's Worst Blogger (as well as nearly-worst food photographer!), I bring you this:

Appetizing, aint it?!

Actually, it *is* quite good - in it's final form :-)

I was surfing around a few weeks ago, asking Google "How can I make my own ranch dressing mix?" (you know, without preservatives and anti-caking agents, and cooties).  And I stumbled onto this recipe.  PERFECT!

So I printed it up and started dumping the ingredients into a bowl and (as usual) wasn't paying SUPER close attention to what I was doing when I accidentally dumped 2-1/2 TABLESPOONS of garlic powder into the bowl - rather than the specified 2-1/2 TEASPOONS.

"Oh sh*t!"

I attempted to scrape-out some of the garlic powder (and realized I was messing-up everything else in the process) so I decided "Aw f**k it!  I *like* garlic!" so I left it alone.

Turned out to be QUITE the Happy Accident and it is now my "Go-To" ingredient for many different things! (BBQ chicken-ranch salad! Yummm!).

So I am giving full credit to Simply Scratch, but I am posting my fubar here so that I can continue to make this Most Excellent ranch mix over-and-over again.  Maybe you'll like it too?

QT's Happy Accident: Garlic Ranch Dressing
Yield about 1 cup

Ingredients:

  • 1 cup dry buttermilk
  • 2 TBS dried parsley flakes (+ 1/2 TBS later)
  • 2 tsp dried dill
  • 2 TBS garlic powder
  • 1-1/2 tsp onion powder
  • 1-1/2 tsp dried onion flakes
  • 2-1/4 tsp sea salt
  • 3/4 tsp sugar (or Splenda, if you prefer)
  • 1/2 tsp fresh-ground black pepper
  • 1/2 tsp smoked paprika
  • a couple of dashes of cayenne pepper
  • 1/2 tsp dried chives
Instructions
  1. Dump everything - except 1/2 TBS of parsley and 1/2 tsp of chives into a small blender or food processor.
  2. Whir it for a few seconds - stop and shake it periodically, as needed - til everything is a fairly uniform power.
  3. Add the remainder of the parsley flakes and chives (so you have a few green bits in there)
  4. Dump everything into a sealable jar (I used a pint canning jar) and store in the freezer for future use. 
How easy was that?!!

To use:  Basically 3 TBS = 1 packet of dried ranch dressing and/or dip mix.  

Salad Dressing: Add 3 TBS dry mix to 1/2 cup mayo, 1/2 cup sour cream and 2/3 to 1 cup buttermilk (or regular milk will probably work - haven't tried it yet)

Dip: 3 TBS dry mix to 1 cup of sour cream

This stuff is soooooo good!

Sunday, March 22, 2015

Picture-less Showgirl Sunday Brunches

Oopsie!  I've fallen behind on my Sunday Brunch postings.  My bad.

I've been a little pre-occupied with doing battle with a certain retailer ("Where America Shops!") (But I won't be - EVER AGAIN!) over a new refrigerator that may - or may not - be delivered sometime before I die!

A rant is coming...  BIGTIME!

Anyhoooo...  Back to the subject at hand.  Showgirl Sunday Brunch!

Last week's brunch really wasn't post-worthy.  It tasted good and all that, but it ended up being FAR too much work, for too little payback.  I'll go ahead and describe it, and post a link to one of the recipes in case you want to try it.

Kielbasa-Scrambled Eggs with Cheese, served with Sweet Potato Hash Browns

The Sweet Potato Hash Brown recipe I followed is here: Paleo Sweet Potato Hash Browns.  I followed it, pretty-much to-the-letter, except I didn't have coconut oil (I used butter and olive oil), and I used "Fine-Almond-Meal" which must be different from Almond Flour since the resulting hash did not stick-together nicely (like hers did), and was kind of grainy.  Plus, I've decided that grating sweet potatoes is just FAR too much work.  I even dragged out my mandolin slicer and attempted to julienne them - to no avail.

They did taste good - but far too labor-intensive.

The eggs were extremely tasty (although not particularly photogenic!).  I buy fresh, locally-made kielbasa from the Farmer's Market - every couple of weeks.  REALLY GOOD kielbasa - not that Hillshire Farms krep from the grocery store (which *used* to taste good - 'til I experienced this stuff!).  I basically cut a few 1/4"-ish slices, quartered 'em, then sauteed lightly with onions in olive oil.  Then I added the scrambled eggs, smushed 'em around 'til cooked, then tossed some "Mexican Blend" cheese on top and smushed some more, til melted and well-blended.  VERY tasty!

* * * *
This week's Showgirl Sunday Brunch got snarfed-down so quickly, I forgot to take a picture!  But it was GOOOOOOD!  Sadly, no measuring (since I was dealing mostly with leftovers!).  Anyway, it was SO GOOD that it's definitely made the "Make This Again" list, so next time I'll measure AND take pictures!  But for now, I'll try to guesstimate what I did:

QT's Corned Beef Hash and Showgirl Poached Eggs

Ingredients

  • Leftover Corned Beef 'n Cabbage (I want to say it was about 2 cups of corned beef and appx 1/4 head of boiled, limp cabbage + a few squishy potatoes and carrot slices)
  • 4 boiling potatoes (I used red-skin and yukon gold)
  • 1/2 of a medium onion
  • 1/2 can (14.5oz) of diced tomatoes with green chiles
  • dash of garlic powder (fresh diced garlic would probably be even better)
Instructions:

I started out kind-of following this video, except I tossed everything into the frying pan all-at-once.  And I substituted the salsa (since I didn't have any on-hand).
  1. Peel and quarter the potatoes.  Place in a pot of boiling water and cook for appx 10 minutes.  You don't want them fully-cooked, just slightly tender.
  2. While the taters are cooking, chop up your leftover corned beef and cabbage (and other leftover bits) into small (1/4-1/2" chunks).  Set aside 'til the taters are done.
  3. When the potatoes are mostly cooked, pour them thru a strainer and run them under cold water.  Once they are cool enough to handle, chop them into small chunks as well.
  4. Mix the potatoes and corned-beef chunks together.  
  5. Add half-can of diced tomatoes/chiles.  I didn't want to drain them, so I used a slotted spoon to get mostly-chunks (but I did end up adding just a little bit of the juice to the mixture).  Toss with  fork til everything is well mixed.
  6. Heat a large saute pan - on medium - with a bit of olive oil.  Add the hash, squish it down with a spatula and let it cook for appx 5 minutes.  Then turn the hash, press it down, and cook for another 5 minutes.  Keep doing this 'til you get a nice crust blended throughout (you may need to do some scraping to accomplish this!).  All told, I think it took about 20-25 minutes to cook...  
  7. Serve with poached eggs on top - garnish with green onions if you've got 'em!
Poached Eggs: I tried this Life-Hack:


It worked surprisingly well, although I used an IKEA clippy thing to close the plastic wrap (rather than a knot), so I had an air bubble at the top which caused the eggs to float and cook unevenly.  I just flipped the pouches over in the water so the "top" got cooked.  IMPORTANT NOTE: Don't forget to grease the plastic wrap - otherwise the egg *will* stick and you'll end up with a helluva mess!

Anyhoooo...  Corned Beef Hash 'n Eggs was Deeee-lish and I definitely will be making it again!

I snagged this photo from Examiner.com
It looks a lot like what we just ate!

Sunday, March 8, 2015

Showgirl Sunday Brunch: Asparagus Mushroom Bacon Frittata


Out here on the West Coast, Spring has definitely Sprung (Yay!), and The Showgirls' production has gone into overdrive!  Every day, I get two or three eggs (rarely just one - and *never* none!).  My little egg-basket on the counter has been re-jiggered multiple times to ensure that the oldest eggs get eaten first!

And yes, I have been eating eggs for breakfast almost every day - just to keep the egg population under control!

(Actually, I am getting ready to start sharing eggs with neighbors!)

Today, I decided to make another frittata* - since that seems to be the best way to use-up eggs quickly!

Today I started with an old (proven-delicious, shared, and received RAVE reviews) Crustless Quiche recipe.  I didn't have all of the ingredients for that particular dish, so I lay in bed this morning debating whether I wanted to :::gasp::: leave the house to procure the necessary items (I didn't!).  Then I pondered what I actually do have on-hand, and this is what I came up with:

QT's Asparagus Mushroom Bacon Frittata
Yields on 9-1/2" pie-plate's worth

Ingredients

  • 2 cups fresh asparagus, cut into 1" chunks (was roughly 15 spears)
  • 6 sliced fresh white mushrooms
  • 1/2 of a medium red onion, diced
  • 4 slices thick-cut applewood bacon (fried, de-greased and chopped into chunks)
  • Jarlsberg Cheese (mild, semi-soft swiss cheese), grated.  Appx 2 cups (I used half of a 10 oz package)
  • Mozzarella Cheese - appx 1/2 cup (?) for the top "crust"
  • 2 TBS sour cream
  • 2 TBS heavy cream
  • As many eggs as it takes to fill-it-up (in my case, it was 10 smallish-medium eggs)
  • Seasoning Salt
Instructions
  1. Preheat your oven to 375°
  2. Chop up your ass-per-grass, toss it in a bowl with a TBS of water and nuke for appx 4 minutes ('til al dente).
  3. Fry up your bacon 'til crisp.  Drain well on a paper towel and reserve some of the bacon grease in the pan.
  4. While the asparagus is nuking (or cooling), and the bacon is de-greasing, lightly saute your onions and mushrooms in the bacon grease.  Sprinkle a few dashes of seasoning salt while sauteeing (I used Goya Adobo All-Purpose Seasoning.  Lawry's works well, too**). 
  5. Once the bacon has cooled, chop it up into small chunks.
  6. Lightly grease a 9-1/2" pie plate.  You can use some of the bacon grease (if it hasn't gotten black and chunky) or olive oil.
  7. Drain, then dump your asparagus into the greased pie plate.  Add onions, mushrooms, and chopped bacon.  Smush 'em around with a fork til everything is evenly distributed.
  8. Grate a generous helping of Jarlsberg cheese on top of the mixture.  Once again, I failed to measure - but I'm guessing it was roughly 1-1/2 - 2 cups (it was definitely half of the 10 oz package!).  Smush again to make sure everything is pretty even.
  9. Whisk your fresh eggs with sour cream and heavy cream.  I started out with 8 eggs (I needed 10!), pour over the veggie/bacon/cheese mixture and stir gently with a fork to ensure even coverage.  If it's not enough egg, whisk a few more and pour 'em in.
  10. Top everything with a thin layer of Mozzarella (make sure you don't have any exposed veggies poking out).  Then I gave it a light shake or two of paprika for color.
  11. Bake for appx 30-45 minutes, til the cheese is golden brown and the eggs are "set" (knife, inserted in center, comes out clean).
Serve and Enjoy!

Frittata with cottage cheese, served al fresco, on my handmade swirly shino plate

Tasting Notes:  Very good.  Very flavorful.  Unfortunately, the bacon was "lost" under the stronger flavors of Jarlsberg cheese and asparagus.  Next time: 6 slices of bacon and maybe do half/half Jarlsberg and Mozzarella for the filling.  Or (better still) Mozzarella for the filling and Jarlsberg for the crust.

*footnote down at the very bottom (where Hubs is not likely to read!):  Hubbie refuses to eat Quiche, but if I tell him it's a Frittata "which is basically an Italian baked omelet" he gobbles it right up! Shhhhhh! ;-)

**I will get a wee bit o'spliff if you use my Amazon links.  Or you can probably just find them at your local grocery store :-)

Sunday, March 1, 2015

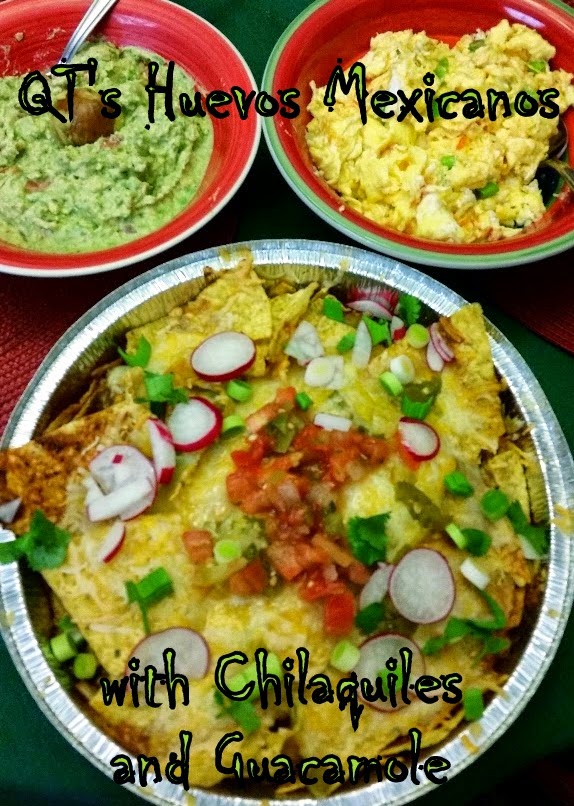
Showgirl Sunday Brunch: Huevos Mexicanos with Chilaquiles and Fresh Guacamole!


So  earlier this week, I got a big-time hankerin' for some Messkin' Food.  Specifically, I was jonesin' for carnitas.  Carnitas is/are basically just Mexican-themed pulled pork.

So Google and I discussed it, and I found a whole slew of recipes, but I was super-duper busy with work so I settled on "crock-pot" carnitas.

Now mind you, I didn't have a pork-roast on-hand (which kinda complicated matters!), so I dashed out to the grocery store before most-of-the-working-world woke-up.  Five bucks and change got me a ~4# bone-in pork shoulder roast.  Perfecto!

Oh, and "while I'm here," let me check the "Cheater's-Seasoning" aisle, and I picked up an envelope of Lawry's Smoky Pork Carnitas seasoning mix (the link is Amazon - pkg of 12 - and yes, I get a wee bit o' spliff if you use it) (but you can pretty-much pick it up at any grocery store, I bet'cha!)

I basically followed the directions on the package, except instead of using a can of tomato paste, I dumped in a 14.5oz can of diced tomatoes with jalapeno peppers, and a smaller (11oz?) can of corn with chipotle peppers.  And I added a teaspoon of Hickory Liquid Smoke to bump-up the smoky flavor.  I ended up with a lot more liquid than I needed  - at the end.  And it was SUPER spicy.  So I poured it off and saved it for Showgirl Sunday Brunch!

Dinner was deeelish (burritos w/mexican rice and refried black beans).  And I ended up with several containers of leftover carnitas!

Okay.  On to today's recipe!

QT's Huevos Mexicanos with Chilaquiles and Fresh Guacamole
Serves two (with lots of leftovers!)

Chilaquiles (which - to me - are basically like a Mexican Lasagna - using soggy tortilla chips in place of pasta) (it tastes a lot better than it sounds - trust me!):

Ingredients:

  • Appx half of an 11oz bag of Tortilla Chips (I used a cheap brand of yellow chips)
  • 1 smallish red onion, thinly sliced
  • 4-5 white mushrooms, sliced
  • ~1 cup of leftover carnitas pork
  • 1/2 cup of leftover excess sauce from the carnitas
  • 1/4 cup cream
  • 1/2 can of Bush's Grillin' Beans - Black Bean Fiesta
  • 1/2 small (4oz) can of diced green chiles
  • Bag of shredded Mexican Blend cheese (Jack+Mild Cheddar+Queso Quesadilla+Asadero)(sadly, my actual measurements are in handfuls - but NO, it didn't take the entire bag!)
  • Garnish(es): Fresh Salsa, sour cream, chopped green onion, sliced radishes, cilantro (whatever works!)
Instructions:

  1. Preheat your oven to 350*.  Dump a thin layer of tortilla chips in the bottom of an oven-safe baking dish (I used a 9" round disposable aluminum pan).  It's okay if they overlap a bit, and if you can't get them to fit properly, break 'em up a little.
  2. Heat-up some oil in a medium frying pan.  Heat-up your leftover carnitas 'til warm.  Then spread the meat somewhat-evenly over the tortilla chips.  Spread a generous handful of cheese on top.
  3. Using the same pan, heat-up half-a-cup of your leftover carnitas sauce (or use some kind of spicy mole sauce - or even salsa, if you prefer).  Pour it into a cup, and mix-in 1/4 cup of cream (makes it creamier and helps to dial-back the spiciness a bit).  Set aside for a moment.
  4. Again, same pan, saute the sliced onions and shrooms 'til tender (add more oil, if needed).  Then dump in half a can of Bushs Black-Bean Fiesta.  Stir it all together 'til well-mixed and everything is warm.  Dump the onion/shroom/bean mixture on top of the chips/meat/cheese.  Top with more cheese :-)
  5. Add another layer of tortilla chips (same rules apply - breakage is fine).  Try to get a good "cover" layer of chips.  Pour the Mole/Sauce/Cream mixture over the whole thing, and top with even MORE cheese (all-told, I think I used roughly 3/4 - 1 cup of shredded cheese).
  6. Sprinkle some chopped green chiles (w/liquid), sparingly, over the top.
  7. Put the whole thing in the oven 'til the cheese is melted and starting to brown (appx 15-20 minutes).
Guacamole

Ingredients:
  • 2 smallish-medium avocados - preferably "somewhat squishy" (but not MUSHY)
  • 1-2 TBS sour cream
  • 1 tsp "Mexican Seasoning"
  • 1 TBS fresh chunky salsa
  • spritz of lime juice (optional - helps prevent browning)
Directions:
  1. Peel and pit the avocados - hang onto one of the seeds (which also helps prevent browning)
  2. Mush 'em with a fork
  3. Add sour-cream and seasoning. Mix 'til it reaches your desired consistency (I like mine somewhat chunky - but if you're a smoothie, then by all mean, pop it in a food processor or whatever!)
  4. Add salsa to taste and stir it one final time.
  5. Put the avocado pit in the middle of your serving dish and it should stay delicious-looking through your meal!
Huevos Mexicanos

Ingredients:
  • 6 medium eggs
  • 1 TBS cream
  • 1 tsp fresh salsa
  • a bit of fresh chopped green onion
  • 1/4 cup shredded Mexican Blend cheese
Directions:
Ha!  I hope I don't have to tell you how to scramble eggs!  I used the same pan as before, but I cleaned it up first (since I prefer my scrambled eggs to remain mostly yellow).  Scramble the eggs first, then as they approach done-ness, toss in your salsa and onions.  Add the cheese last and stir til everything's nicely mixed.

Serve and Enjoy!

Brought to you by...
The Vegas Showgirls
Enjoying a nice, refreshing dust-bath after a long day of egg-laying!


Sunday, February 22, 2015

Showgirl Sunday Brunch: Leftover Lasagna Frittata


Long Story Short (No. Really!):  We have three Polish hens now, nicknamed (appropriately enough) The Vegas Showgirls.

Henny Kravitz - Silver-laced Polish:
Henny is the 'Lead Hen' - but she's a bit of a curmudgeon.  And she b*tches a lot.

Tina Turner - Golden-laced Polish:
Tina is the Food-Ho.  
She will actually leap and lunge at the fence when I come out with treats!
She also has the loudest singing voice.

Debbie Harry - aka Blondie - Buff-laced Polish:
Blondie, the Newbie, joined the fam on Jan 17, 2015
She is at the bottom of the pecking order.
And, being blonde, she's a bit of a ditz.


And all three girls are laying now - Yay!  We are getting an average of a dozen mid-sized eggs per week!

So End-Result: Showgirl Sunday Brunch has become "A Thing!"

I've become such a suck-tastic blogger, of late - yet I am making these simply scrumptious egg-dishes every week (for now, I'm trying to 'keep it different' each time), so I think I oughtta be able to manage to post ONE egg-recipe, per week - Right?!

We'll see....

Luckily, I've been posting our weekly Showgirl Sunday Brunches on Facebook, so I should be able to go back and re-construct past recipes.  And, going forward, I'll actually make an attempt to - ohhhh...  Maybe "measure" stuff as I'm going along (HEY!).

Today, unfortunately, was NOT one of my measuring days - but roll with it, k?  'Cause I'm sure it's gonna be deeeelish!

Earlier this week, I made a lasagna (mostly) from scratch, using (mostly) home-grown veggies.  Not gonna deconstruct the recipe ('cause I'll never be able to duplicate it!).  I will say that a couple of the layers were frozen-chopped spinach (thawed+squeezed dry) with a little bit of fresh pesto sauce, ricotta cheese and egg.  I note that because I made too much (that "measuring" thing I keep alluding to!), and it ended up in the frittata.

QT's Leftover Lasagna Frittata
Yield: 1 @ 9-1/2" pie's worth (serves 4-6 - depending on how hungry you are!)

Ingredients

  • 1 serving of leftover lasagna - probably about a heaping cup's worth (any lasagna will do, I expect)
  • 1/2 cup of spinach-ricotta mixture (or use more lasagna)
  • half of a small red onion, chopped (or thinly sliced)
  • 4-5 fresh white mushrooms, sliced
  • appx 2oz of cubed ham
  • 9 smallish-medium-ish eggs (less if you're using large eggs)
  • 1/4 c heavy whipping cream (or half-n-half)
  • A whole lotta shredded cheese! I used (mainly) mozzarella, 3-cheese 'Mexican Blend' (Jack+Mild Cheddar+Queso Quesadilla+Asader0) and 3-cheese 'Italian Blend' (Parm+Asiago+Romano)
  • Italian seasoning and/or garlic salty seasoning (I used Goya Adobo all-purpose seasoning and my McCormick Italian-herb grinder)
  • Olive oil

Instructions

  1. Preheat your oven to 375*F.  Drizzle a little olive oil into a 9-1/2" pie plate (I used basil-infused EVOO - yum!).  
  2. Chop-up a serving of lasagna and plop it into the pie plate.  Spoon in the spinach-ricotta mixture and smush it around with the lasagna so the stuff is - more-or-less - evenly distributed.
  3. Heat a frying pan with a little olive oil.  Lightly saute the onions and mushrooms 'til soft, sprinkle-on a little Italian seasoning.  Toss in the cubed ham.  Warm it all up then toss it into the pie plate and add a generous handful (or three!) of shredded cheese(s).  Gently combine with all the other stuff.
  4. Now you need to step back and try to guess how much egg mixture you're gonna need (I haven't perfected this yet!).  I started out with 6 eggs + a splash of cream.  Whisk it well, sprinkled in some garlic-salt, then pour into the pie plate.  It wasn't enough, so I scrambled up 3 more eggs and poured 'em in.  
  5. Poke around with a fork to make sure the egg mixture is well-incorporated into the rest of the gloop.  If any lasagna/veggie bits make it to the surface, press them down so they are covered with egg.  
  6. Top the whole thing with even more cheese.  For the top 'crust' (the melty-cheese becomes crust-like) I stuck with mainly 3-cheese Italian and Mozzarella (Heavier on the mozz-chs, The other cheeses are a bit overpowering).
  7. Put the whole thing in the oven for appx 45 minutes.  Check it toward the end to make sure it' browning evenly.  Spin it around, if necessary.  The top should be golden brown and the center should be somewhat firm.  I did the ol' stick-a-knife-in-it test, and my knife came out clean - so it's done.

Truly deelish!  A bit "savory" for breakfast, but makes a mighty-fine brunch.  And I'm sure it will freeze and nuke quite nicely!

Okay, picture time (yep, phone pics and the lighting sucks 'cause one of our stove-hood fixtures decided to die - oopsie!):

Chopped Lasagna and Spinach-Ricotta Mix in the EVOO-greased pie-plate
I tossed a couple handfuls of 3-cheese Mexican Blend on top

Lightly sauteed onions, shrooms and ham were next

Lasagna + Spin-ricotta+Cheese+Sauteed gloop.
Plus a couple handfuls of shredded Mozzarella

6 eggs, ready to be scrambled.  Turned-out I needed 3 more...

Made sure all the "innards" got smushed into the eggs.
What's that?  More cheese?!
Yes, please! (Mozz + 3-cheese Italian)

All done!

Saturday, November 22, 2014

Recipe: Sugar-Free Hot Cocoa Mix (Dry)

Quick!  Post it before you forget!!!

Folks who know me will readily acknowledge that what *I* consider to be coffee, really doesn't resemble coffee. At. All.

First, I like super-wimpy "Breakfast Blends."  Then I add so much crap to it, that it's really more of a coffee-kissed mocha-breve-latte.

My morning coffee consists of 1 TBS of Fat-Free/Sugar-Free Hot Cocoa, 10 oz of wimpy, watered-down coffee, a splash of Sugar-Free Coconut Syrup, a packet of Sweet 'n Low, and a couple TBS of cream.

I *used* to like Nestle brand Fat-Free Hot Cocoa - when you could find it in a big tub, for relatively-cheap.  Now I can only find it in Individual-serving envelopes (in a box), and it ain't cheap.

Plus, Nestle is one of the "Baddies" in the fight against GMO-labeling.

Ghirardelli is GMO-free.

Okay, gonna make my own Sugar-Free Hot Cocoa Mix using Ghirardelli unsweetened cocoa, then.  So there!

Sugar-Free Hot Cocoa Mix
Adapted from http://www.melskitchencafe.com/homemade-hot-chocolate-mix-another-simple-gift-idea/

1 cup Nonfat Dry Milk (Yeah, probably not GMO-free. Oh well!)
2/3 cup Splenda (Also not GMO-free.  "Baby steps!")
1/2 cup Ghirardelli unsweetened cocoa powder

Mix it all together and store in an airtight container.

To use it as hot cocoa, put 1/3 cup of the cocoa mix in a cup, stir-in 1 cup of hot milk. Enjoy!

Notes: I buy Nonfat Dry Milk in a package that contains 3 envelopes (that make 1 quart of milk, apiece).  1 envelope = 1 cup.

Sorry, no pics (I suspect you know what a cup of coffee - or cocoa! - looks like!).  I just wanted to type it out so I don't lose the recipe!

Oh, and it's quite tasty!


Thursday, November 20, 2014

Thanksgiving Day Battle-Plan

Now I have NO clue why I'm publishing this "for all the world to see" - but I *do* reference my own blog (with alarming frequency, actually), when I want to reference old recipe ideas...

So, today I decided to start my "Plan of Attack" for Thanksgiving, this year.

Now, it's not like I'm freaking Martha Stewart or anything (Good GAWD), planning a Thanksgiving Feast for 250.  Nor am I June Cleaver (Bwahahaha! *SNORT!*).

It's really just Hubs and me (and the dogs!  Mustn't forget the hounds!).  But I figure a little forethought never hurt anybody.  Plus, I know I need to do the Grocery Store Thang...  And I *want* to do the Farmer's Market Thang (realizing that the FM probably isn't gonna have everything I need, veggie-wise)...

So there's all my "Justification!"

Now, I'm just gonna post the Thanksgiving Menu, and the proper-order of Execution.  And I *may* even include a SHOPPING LIST (Woooooooooo!)

(Yeah.  I'm weird.  Deal with it!)

* * * * *
Okay, here 'tis:

Thanksgiving Battle Plan

Weds Morning – Turkey Brine and Pumpkin-Pecan Pie

Turkey Brine
- 1.5 C Apple Cider
- 1 Quart Water
- 2 TBS Fresh Rosemary
- 1-2 TBS Fresh Sage
- 3 Cloves Minced Garlic
- ¾ C Sea Salt
- ½ C Splenda Brown Sugar Blend
- 1-1/2 TBS Whole Peppercorns
- 3 Bay Leaves
- Zest from 2 Oranges

Combine in medium pot, medium heat. Stir until salt/sugar dissolve. Bring to a boil. Turn-off stove and allow to cool.

Reserve ½ cup of brine (for injection marinade).

Pour brine into 2 gallon Ziplock, add 3 quarts water, mix well.   Add turkey. Put in fridge for 18-24 hours.

Pumpkin Pecan Pie

-          ¾ cup Truvia Baking Blend
-          2 tsp Pumpkin Pie Spice
-          ½ tsp Salt
-          2 Large Eggs
-          1 Can (15oz) Pumpkin
-          1 Can (12oz) Evaporated Milk
-          1 Unbaked Deep-Dish Pie Crust

MIX
sugar, cinnamon, salt, ginger and cloves in small bowl. Beat eggs in large bowl. Stir in pumpkin and sugar-spice mixture. Gradually stir in evaporated milk.

POUR into pie shell.

BAKE in preheated 425° F oven for 15 minutes. Reduce temperature to 350° F; bake for 40 to 50* minutes or until knife inserted near center comes out clean. Cool on wire rack for 2 hours. Serve immediately or refrigerate. Top with whipped cream before serving.

*Pecan Topping:
-          ½ C Pecan Halves
-          ¼ C Butter
-          ¼ C Brown Sugar
Chop about 1/2 cup of pecans and add them to a sauce pan with 1/4 cup butter and 1/4 cup brown sugar. Over low to medium heat, let the butter sizzle and caramelize the sugar, but be careful not to let the butter burn! remove from heat and set aside.  Pour on top of pie about 15 minutes before it’s done (when it’s firm, but looks soft/wet in center).


* * * * *
Thanksgiving Day

àAllow appx 2-1/2 – 3 hours for cooking the bird.

Rinse the bird under cold running water.  Then let it soak in plain water for 15 minutes.

Turkey Injection Marinade
Mine-All-Mine!

-          ½ C of Reserved brine (from yesterday)
-          ½ C No/Low-Sodium Chicken Broth
-          ½ C Unsalted Butter, melted
-          3 TBS Lemon Juice
-          ½ tsp Garlic Powder
-          ½ tsp Onion Powder
-          ½ tsp Finely Ground Pepper
-          ½ tsp Rubbed Sage
-          1 T Splenda Brown-Sugar Blend

Melt the butter in a small saucepan and add the rest of the stuff. Stir ‘til well blended.

Reserve 1/2 cup  of marinade (for stuffing)

Inject the bird about an hour before cooking.  Let it rest in a foil pan for an hour.  Then, into the cooker!

Southern Style Candied Yams (1 hour)
-          4 large sweet taters
-          1 stick unsalted butter
-          2 cups Stevia/Sugar Blend
-          ¼ C Cream
-          3 tsp Cinnamon
-          ½ tsp Nutmeg
-          2 dashes Ground Cloves
-          1-2 TBS Maple Syrup
-          ½ TBS Vanilla Extract

Wash, peel, slice yams appx ½” thick rounds. Place in 12x9 baking dish. Melt butter over medium heat. Add sugar, stir til blended.  Add cream, stirring constantly.  Add spices and maple/vanilla.  Taste-test.

Pour over yams, cover with foil, bake @ 350* for 40 mins. Remove foil, stir, then bake add’l 20-25 mins. Plate and spoon syrup over yams.

(Hubs doesn't seem to care for yams, and I'm kinda "mediocre" about 'em - but dammit! - they're "traditional!" So I haven't given-up yet!)


Green Bean Casserole (30-35 mins)

-          2 Cans (15oz) French-cut Green Beans (drained? Reserve – just in case)
-          1 Can (10.75oz) Cream of Mushroom Soup
-          Handful of Fresh White Mushrooms, sliced
-          ¾ C Sour Cream
-          ½ C Chopped Onion
-          ¾ C Shredded Cheddar
-          ¾ tsp Garlic Powder
-          1 tsp Soy Sauce
-          1 Can (2.8oz) Cheddar/French-Fried Onions
Dump everything except FF Onions into medium casserole dish.  Blend well.  Bake at 350* for 25 mins.  Stir, then add FF onions. Cook add’l 10 mins ‘til brown.

(Oddly, we *never* had green-bean casserole when I was a kid - but I now consider it "mandatory" for Thanksgiving!) (How long has green-bean casserole been around, anyway?  Curious...) 

Stuffing!!! (20-30 mins)
Mine-All-Mine!
-          ½ C of Reserved Marinade
-          1-1/4 C Apple Cider
-          1-1/4 C Unsalted Chicken Broth
-          ½ C Butter
-          2 Boxes Stove-Top Stuffing Mix
-          Chicken-Apple Sausage (4 links – chunked/chopped)
-          1 Medium Red Onion, chopped
-          2-3 Stalks Celery, chopped
-          ½ C Craisins (appx)
-          ½ C Chopped Pecans (appx)
-          Couple of Granny Smith Apples, peeled and chopped (New addition – curious to know how it works out)

Heat up marinade, cider, broth and butter in a medium saucepan.  *Check the Salt Level* - Adjust, if necessary
In separate small frying pan, brown the sausage and saute onion and celery ‘til limp.  Add sausage, onions, celery to marinade stuff.  Dump in Stuffing mix and toss in the Craisins, Pecans and Apples.  Mix well.  Dump into an 8x8 aluminum cake pan (or two!).  Bake at 350* for 20-30 mins.

(Stuffing is THE BEST part of Thanksgiving!)

Mashed Potatoes and Gravy

Stove-top, maybe 15-20 mins?  

Pretty self-explanatory.  

Salted, boiled, peeled 'taters, water drained.  Mash.  Add cream and salt + white pepper.

Gravy: Boiled, chopped giblets (no liver!), canned gravy from store, add some de-greased turkey drippings, chicken broth and (optional) thickener (if needed)

Thickener: either flour+butter roux or corn-starch+ water (whatever you've got on-hand)

(Mashed 'taters are like the "plain cousin" to stuffing!)

Crescent Rolls

Yep, from a can!

(Yawn)

Cranberry Sauce or Relish
I'm going to use my Cranberry-Apple Jam for cranberry sauce, this year.  Maybe toss-in some finely chopped pecans and some orange zest and mix it up.

* * * * *
Now, prepare to be frightened (I know *I* am!), but here is the Master Shopping List for this year's Thanksgiving Extravaganza (bearing in mind, that I already have most of this stuff!)

Qty
Item
1 box
Brown Sugar

12oz can
Evaporated Milk

???
Flour or Corn Starch

1-2 bags
Splenda Brown Sugar Blend

1-2 bags
Stevia/Sugar Baking Blend

Small bottle
Maple Syrup

1
10.75 can Cream of Mushroom Soup

1
15 oz can pumpkin

2
15 oz cans french-cut green beans

1-2
2.8 oz cans of French-Fried Onions ("Cheddar")

2 cartons
32 oz low-sodium (or no salt) Chicken Broth

2 boxes
Stove Top Stuffing Mix - Turkey Flavored

1-2 cans
Turkey Gravy

1 quart
Heavy (Whipping) Cream

1 pint
Sour Cream

1 box
Sweet Butter (reg butter)

1 box
Unsalted Butter

Big Bag
Pecan Halves

1 bottle
Soy Sauce 

1
9" Deep-Dish Frozen Pie Crust

1 gallon
Apple Cider

16 oz.
Chicken Apple Sausage

???
Giblets (if avail)

9-10#
Organic Turkey Breast (or 10-12# Whole)

1-2 pkgs
Craisins

1 head
Garlic

1-2
Granny Smith Apples

1
Head Celery

1-2
Lemons

2-3
Medium Onions

3-4
Oranges

few sprigs
Rosemary

few sprigs
Sage

4 large
Sweet Potatoes/Yams

8 oz
White Mushrooms

???
White or Red Potatoes (I "eyeball" it)

1-2 cans
Crescent Rolls

Jar
Bay Leaves

Jar
Cinnamon

Jar
Garlic Powder

Jar
Ground Cloves

Jar
Ground pepper (fresh ground is better)

Jar
Nutmeg

Jar
Onion Powder

Jar
Pumpkin Pie Spice

Jar
Rubbed Sage

Jar
Sea Salt

Small bottle
Vanilla Extract (the REAL stuff!)

Jar
White Pepper

Jar
Whole peppercorns


View my page on Meet the Phlockers