Sunday, March 22, 2015

Picture-less Showgirl Sunday Brunches

Oopsie!  I've fallen behind on my Sunday Brunch postings.  My bad.

I've been a little pre-occupied with doing battle with a certain retailer ("Where America Shops!") (But I won't be - EVER AGAIN!) over a new refrigerator that may - or may not - be delivered sometime before I die!

A rant is coming...  BIGTIME!

Anyhoooo...  Back to the subject at hand.  Showgirl Sunday Brunch!

Last week's brunch really wasn't post-worthy.  It tasted good and all that, but it ended up being FAR too much work, for too little payback.  I'll go ahead and describe it, and post a link to one of the recipes in case you want to try it.

Kielbasa-Scrambled Eggs with Cheese, served with Sweet Potato Hash Browns

The Sweet Potato Hash Brown recipe I followed is here: Paleo Sweet Potato Hash Browns.  I followed it, pretty-much to-the-letter, except I didn't have coconut oil (I used butter and olive oil), and I used "Fine-Almond-Meal" which must be different from Almond Flour since the resulting hash did not stick-together nicely (like hers did), and was kind of grainy.  Plus, I've decided that grating sweet potatoes is just FAR too much work.  I even dragged out my mandolin slicer and attempted to julienne them - to no avail.

They did taste good - but far too labor-intensive.

The eggs were extremely tasty (although not particularly photogenic!).  I buy fresh, locally-made kielbasa from the Farmer's Market - every couple of weeks.  REALLY GOOD kielbasa - not that Hillshire Farms krep from the grocery store (which *used* to taste good - 'til I experienced this stuff!).  I basically cut a few 1/4"-ish slices, quartered 'em, then sauteed lightly with onions in olive oil.  Then I added the scrambled eggs, smushed 'em around 'til cooked, then tossed some "Mexican Blend" cheese on top and smushed some more, til melted and well-blended.  VERY tasty!

* * * *
This week's Showgirl Sunday Brunch got snarfed-down so quickly, I forgot to take a picture!  But it was GOOOOOOD!  Sadly, no measuring (since I was dealing mostly with leftovers!).  Anyway, it was SO GOOD that it's definitely made the "Make This Again" list, so next time I'll measure AND take pictures!  But for now, I'll try to guesstimate what I did:

QT's Corned Beef Hash and Showgirl Poached Eggs

Ingredients

  • Leftover Corned Beef 'n Cabbage (I want to say it was about 2 cups of corned beef and appx 1/4 head of boiled, limp cabbage + a few squishy potatoes and carrot slices)
  • 4 boiling potatoes (I used red-skin and yukon gold)
  • 1/2 of a medium onion
  • 1/2 can (14.5oz) of diced tomatoes with green chiles
  • dash of garlic powder (fresh diced garlic would probably be even better)
Instructions:

I started out kind-of following this video, except I tossed everything into the frying pan all-at-once.  And I substituted the salsa (since I didn't have any on-hand).
  1. Peel and quarter the potatoes.  Place in a pot of boiling water and cook for appx 10 minutes.  You don't want them fully-cooked, just slightly tender.
  2. While the taters are cooking, chop up your leftover corned beef and cabbage (and other leftover bits) into small (1/4-1/2" chunks).  Set aside 'til the taters are done.
  3. When the potatoes are mostly cooked, pour them thru a strainer and run them under cold water.  Once they are cool enough to handle, chop them into small chunks as well.
  4. Mix the potatoes and corned-beef chunks together.  
  5. Add half-can of diced tomatoes/chiles.  I didn't want to drain them, so I used a slotted spoon to get mostly-chunks (but I did end up adding just a little bit of the juice to the mixture).  Toss with  fork til everything is well mixed.
  6. Heat a large saute pan - on medium - with a bit of olive oil.  Add the hash, squish it down with a spatula and let it cook for appx 5 minutes.  Then turn the hash, press it down, and cook for another 5 minutes.  Keep doing this 'til you get a nice crust blended throughout (you may need to do some scraping to accomplish this!).  All told, I think it took about 20-25 minutes to cook...  
  7. Serve with poached eggs on top - garnish with green onions if you've got 'em!
Poached Eggs: I tried this Life-Hack:


It worked surprisingly well, although I used an IKEA clippy thing to close the plastic wrap (rather than a knot), so I had an air bubble at the top which caused the eggs to float and cook unevenly.  I just flipped the pouches over in the water so the "top" got cooked.  IMPORTANT NOTE: Don't forget to grease the plastic wrap - otherwise the egg *will* stick and you'll end up with a helluva mess!

Anyhoooo...  Corned Beef Hash 'n Eggs was Deeee-lish and I definitely will be making it again!

I snagged this photo from Examiner.com
It looks a lot like what we just ate!

Sunday, March 8, 2015

Showgirl Sunday Brunch: Asparagus Mushroom Bacon Frittata


Out here on the West Coast, Spring has definitely Sprung (Yay!), and The Showgirls' production has gone into overdrive!  Every day, I get two or three eggs (rarely just one - and *never* none!).  My little egg-basket on the counter has been re-jiggered multiple times to ensure that the oldest eggs get eaten first!

And yes, I have been eating eggs for breakfast almost every day - just to keep the egg population under control!

(Actually, I am getting ready to start sharing eggs with neighbors!)

Today, I decided to make another frittata* - since that seems to be the best way to use-up eggs quickly!

Today I started with an old (proven-delicious, shared, and received RAVE reviews) Crustless Quiche recipe.  I didn't have all of the ingredients for that particular dish, so I lay in bed this morning debating whether I wanted to :::gasp::: leave the house to procure the necessary items (I didn't!).  Then I pondered what I actually do have on-hand, and this is what I came up with:

QT's Asparagus Mushroom Bacon Frittata
Yields on 9-1/2" pie-plate's worth

Ingredients

  • 2 cups fresh asparagus, cut into 1" chunks (was roughly 15 spears)
  • 6 sliced fresh white mushrooms
  • 1/2 of a medium red onion, diced
  • 4 slices thick-cut applewood bacon (fried, de-greased and chopped into chunks)
  • Jarlsberg Cheese (mild, semi-soft swiss cheese), grated.  Appx 2 cups (I used half of a 10 oz package)
  • Mozzarella Cheese - appx 1/2 cup (?) for the top "crust"
  • 2 TBS sour cream
  • 2 TBS heavy cream
  • As many eggs as it takes to fill-it-up (in my case, it was 10 smallish-medium eggs)
  • Seasoning Salt
Instructions
  1. Preheat your oven to 375°
  2. Chop up your ass-per-grass, toss it in a bowl with a TBS of water and nuke for appx 4 minutes ('til al dente).
  3. Fry up your bacon 'til crisp.  Drain well on a paper towel and reserve some of the bacon grease in the pan.
  4. While the asparagus is nuking (or cooling), and the bacon is de-greasing, lightly saute your onions and mushrooms in the bacon grease.  Sprinkle a few dashes of seasoning salt while sauteeing (I used Goya Adobo All-Purpose Seasoning.  Lawry's works well, too**). 
  5. Once the bacon has cooled, chop it up into small chunks.
  6. Lightly grease a 9-1/2" pie plate.  You can use some of the bacon grease (if it hasn't gotten black and chunky) or olive oil.
  7. Drain, then dump your asparagus into the greased pie plate.  Add onions, mushrooms, and chopped bacon.  Smush 'em around with a fork til everything is evenly distributed.
  8. Grate a generous helping of Jarlsberg cheese on top of the mixture.  Once again, I failed to measure - but I'm guessing it was roughly 1-1/2 - 2 cups (it was definitely half of the 10 oz package!).  Smush again to make sure everything is pretty even.
  9. Whisk your fresh eggs with sour cream and heavy cream.  I started out with 8 eggs (I needed 10!), pour over the veggie/bacon/cheese mixture and stir gently with a fork to ensure even coverage.  If it's not enough egg, whisk a few more and pour 'em in.
  10. Top everything with a thin layer of Mozzarella (make sure you don't have any exposed veggies poking out).  Then I gave it a light shake or two of paprika for color.
  11. Bake for appx 30-45 minutes, til the cheese is golden brown and the eggs are "set" (knife, inserted in center, comes out clean).
Serve and Enjoy!

Frittata with cottage cheese, served al fresco, on my handmade swirly shino plate

Tasting Notes:  Very good.  Very flavorful.  Unfortunately, the bacon was "lost" under the stronger flavors of Jarlsberg cheese and asparagus.  Next time: 6 slices of bacon and maybe do half/half Jarlsberg and Mozzarella for the filling.  Or (better still) Mozzarella for the filling and Jarlsberg for the crust.

*footnote down at the very bottom (where Hubs is not likely to read!):  Hubbie refuses to eat Quiche, but if I tell him it's a Frittata "which is basically an Italian baked omelet" he gobbles it right up! Shhhhhh! ;-)

**I will get a wee bit o'spliff if you use my Amazon links.  Or you can probably just find them at your local grocery store :-)

Sunday, March 1, 2015

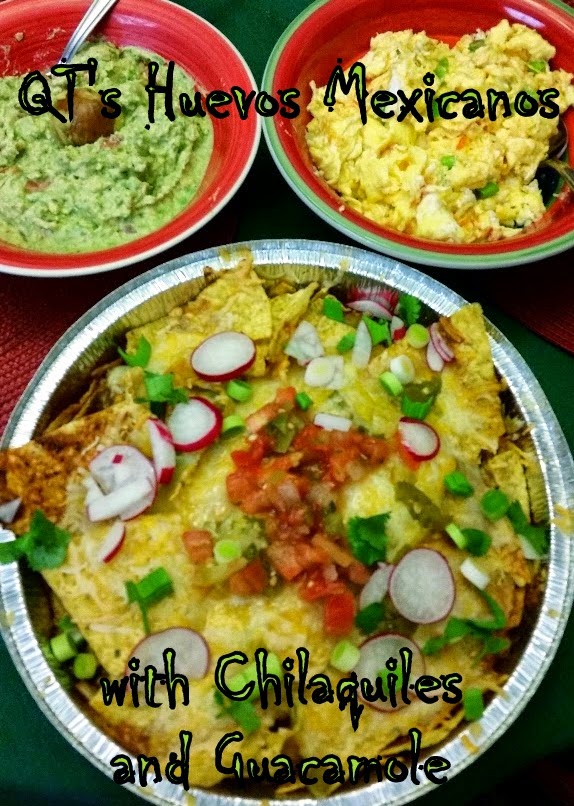
Showgirl Sunday Brunch: Huevos Mexicanos with Chilaquiles and Fresh Guacamole!


So  earlier this week, I got a big-time hankerin' for some Messkin' Food.  Specifically, I was jonesin' for carnitas.  Carnitas is/are basically just Mexican-themed pulled pork.

So Google and I discussed it, and I found a whole slew of recipes, but I was super-duper busy with work so I settled on "crock-pot" carnitas.

Now mind you, I didn't have a pork-roast on-hand (which kinda complicated matters!), so I dashed out to the grocery store before most-of-the-working-world woke-up.  Five bucks and change got me a ~4# bone-in pork shoulder roast.  Perfecto!

Oh, and "while I'm here," let me check the "Cheater's-Seasoning" aisle, and I picked up an envelope of Lawry's Smoky Pork Carnitas seasoning mix (the link is Amazon - pkg of 12 - and yes, I get a wee bit o' spliff if you use it) (but you can pretty-much pick it up at any grocery store, I bet'cha!)

I basically followed the directions on the package, except instead of using a can of tomato paste, I dumped in a 14.5oz can of diced tomatoes with jalapeno peppers, and a smaller (11oz?) can of corn with chipotle peppers.  And I added a teaspoon of Hickory Liquid Smoke to bump-up the smoky flavor.  I ended up with a lot more liquid than I needed  - at the end.  And it was SUPER spicy.  So I poured it off and saved it for Showgirl Sunday Brunch!

Dinner was deeelish (burritos w/mexican rice and refried black beans).  And I ended up with several containers of leftover carnitas!

Okay.  On to today's recipe!

QT's Huevos Mexicanos with Chilaquiles and Fresh Guacamole
Serves two (with lots of leftovers!)

Chilaquiles (which - to me - are basically like a Mexican Lasagna - using soggy tortilla chips in place of pasta) (it tastes a lot better than it sounds - trust me!):

Ingredients:

  • Appx half of an 11oz bag of Tortilla Chips (I used a cheap brand of yellow chips)
  • 1 smallish red onion, thinly sliced
  • 4-5 white mushrooms, sliced
  • ~1 cup of leftover carnitas pork
  • 1/2 cup of leftover excess sauce from the carnitas
  • 1/4 cup cream
  • 1/2 can of Bush's Grillin' Beans - Black Bean Fiesta
  • 1/2 small (4oz) can of diced green chiles
  • Bag of shredded Mexican Blend cheese (Jack+Mild Cheddar+Queso Quesadilla+Asadero)(sadly, my actual measurements are in handfuls - but NO, it didn't take the entire bag!)
  • Garnish(es): Fresh Salsa, sour cream, chopped green onion, sliced radishes, cilantro (whatever works!)
Instructions:

  1. Preheat your oven to 350*.  Dump a thin layer of tortilla chips in the bottom of an oven-safe baking dish (I used a 9" round disposable aluminum pan).  It's okay if they overlap a bit, and if you can't get them to fit properly, break 'em up a little.
  2. Heat-up some oil in a medium frying pan.  Heat-up your leftover carnitas 'til warm.  Then spread the meat somewhat-evenly over the tortilla chips.  Spread a generous handful of cheese on top.
  3. Using the same pan, heat-up half-a-cup of your leftover carnitas sauce (or use some kind of spicy mole sauce - or even salsa, if you prefer).  Pour it into a cup, and mix-in 1/4 cup of cream (makes it creamier and helps to dial-back the spiciness a bit).  Set aside for a moment.
  4. Again, same pan, saute the sliced onions and shrooms 'til tender (add more oil, if needed).  Then dump in half a can of Bushs Black-Bean Fiesta.  Stir it all together 'til well-mixed and everything is warm.  Dump the onion/shroom/bean mixture on top of the chips/meat/cheese.  Top with more cheese :-)
  5. Add another layer of tortilla chips (same rules apply - breakage is fine).  Try to get a good "cover" layer of chips.  Pour the Mole/Sauce/Cream mixture over the whole thing, and top with even MORE cheese (all-told, I think I used roughly 3/4 - 1 cup of shredded cheese).
  6. Sprinkle some chopped green chiles (w/liquid), sparingly, over the top.
  7. Put the whole thing in the oven 'til the cheese is melted and starting to brown (appx 15-20 minutes).
Guacamole

Ingredients:
  • 2 smallish-medium avocados - preferably "somewhat squishy" (but not MUSHY)
  • 1-2 TBS sour cream
  • 1 tsp "Mexican Seasoning"
  • 1 TBS fresh chunky salsa
  • spritz of lime juice (optional - helps prevent browning)
Directions:
  1. Peel and pit the avocados - hang onto one of the seeds (which also helps prevent browning)
  2. Mush 'em with a fork
  3. Add sour-cream and seasoning. Mix 'til it reaches your desired consistency (I like mine somewhat chunky - but if you're a smoothie, then by all mean, pop it in a food processor or whatever!)
  4. Add salsa to taste and stir it one final time.
  5. Put the avocado pit in the middle of your serving dish and it should stay delicious-looking through your meal!
Huevos Mexicanos

Ingredients:
  • 6 medium eggs
  • 1 TBS cream
  • 1 tsp fresh salsa
  • a bit of fresh chopped green onion
  • 1/4 cup shredded Mexican Blend cheese
Directions:
Ha!  I hope I don't have to tell you how to scramble eggs!  I used the same pan as before, but I cleaned it up first (since I prefer my scrambled eggs to remain mostly yellow).  Scramble the eggs first, then as they approach done-ness, toss in your salsa and onions.  Add the cheese last and stir til everything's nicely mixed.

Serve and Enjoy!

Brought to you by...
The Vegas Showgirls
Enjoying a nice, refreshing dust-bath after a long day of egg-laying!


View my page on Meet the Phlockers