See, we've got a "Special Needs Dog," Tazz-The-Spazz. She has shattered all of my Old-Wiener-Dog Records by living well beyond the 14-1/2 year mark. In fact, she is approaching 16 now! She is our "Full-Throttle-Dog" who has always lived life to the fullest! Our racing champ, and a veteran of multiple surgeries (including two neuro-surgeries for her back - which makes her OFFICIALLY more expensive than my Harley!).
Tazz has definitely slowed WAY down in her Golden Years. But, thus far, she still seems to be comfortable and happy - and I am committed to keeping her that way. Her meals are all home-cooked (ground turkey and rice), she takes glucosamine daily, and when she feels creaky (i.e. rainy, cold days), we give her Rimadyl (basically doggie-aspirin). If she ever reaches a point where we can't keep her comfortable... Well, we'll make the appropriate "decision" for her. But let's not go there, k?!
Seriously, she's still doing Pretty-Okay for an old girl. She gives herself exercise by having "walkabouts" in the yard - usually 2-3 times per day - she walks the perimeter (and it's a mighty-long perimeter, especially considering that her legs are only about 3" long!).
And she *still* gets excited when papa throws her tennis ball. Seriously! This dog is absolutely POSSESSED when papa throws the ball. Now when mama throws it, "Meh!" She'll kinda half-heartedly galumph for a stride or two, then slow to a ramble. But papa?! Hell, she RUNS! If she catches it on a bounce, she'll roll around on the grass in sheer delight! She even still brings the ball back - on "good" days - but she's a far cry from the OCD Ball-Chasing Lunatic that she used to be (When it got so bad, we'd have to take her ball away. She droves us absolutely CRAZY)
Yay! Papa's throwing the ball!
We are making reasonable accommodations for her. Her hearing isn't what it used to be, and her vision is definitely deteriorating. We've had to keep the pool covered this summer (due to the drought - we want to minimize evaporation), and I am terrified of the dog falling in and slipping under the cover. So we installed "landing lights" around the pool (solar rope lights).

Weenie-Dog Landing Lights
(view from the diving board end)
(view from the diving board end)

Cooler-lookin' view - including the TiKi BaR
We don't leave the pool-light on when it's covered
We don't leave the pool-light on when it's covered
Just the rope lights around the perimeter
We also installed a Doggie-Door for Tazz, and she has the luxury of "freedom" to sleep wherever she chooses (the youngsters sleep in their crate). Tazz sleeps, pretty-much, all of the time! But she alternates between her two beds in the family room (one with a doggie-heating-pad and woobie, and a second unheated bed), and the doggie-bed/woobie combo in the kitchen.
She seemed to be having some trouble locating the doggie-door at night, however, so I bought some cheap solar lights from the Dollar Tree (that kept falling over and rolling away!).
Okay, so THAT brings us to my Crafty Crap post! (Jeez! FINALLY!)
Last week, this showed-up in my In-Box from Living Social:

Hey - Crappy cell-phone pic!
$14.99 for one solar mason jar light
$39.99 for three. Plus $3.99 shipping
Seemed like a cool idea. But at almost $20 apiece I was *not* feelin' the love! Hey - I've got all these tippy-over solar lights in the yard already, and Gawd-knows I've got a sh*t-ton of canning jars! Maybe I can make some myself! Here is what I did:
All the stuff you'll need:

(Minus the better-battery)
Start with a Dollar Tree Lamp like thus:

It's actually a pretty cool-lookin' lamp
But unstable as hell!
Our Dollar Tree had a few of 'em left (end of summer). They had black or white available, but I think they came in other colors as well - doesn't matter. Also, you don't *have* to use this specific lamp - look for anything that has a top "puck" (circled below) that will fit inside the top ring of a mason jar.

The circled part is the only piece you'll need.
Next thing you're gonna do is take the lamp apart. Remove the shade (which blows away when it tips over anyway!), then unscrew the top "puck" which contains the LED bulbs, a battery and the solar panel on top. You may or may not want to use the bulb cover/diffuser (white cover directly under the "puck").
Cost, so far, $1.00
Now this next step was one I'd skipped, the first time around. But it's a necessary step! See, Dollar Tree lamps come with anemic AAA 100mAh Ni-Cd batteries that will not last through the night (they actually only stay lit for about an hour).
Replace that bad-boy with something "juicier!" I happened to have some 850mAh NiMHs laying around. Google tells me that you can find even juicier rechargeable AAA's for appx $2.00 apiece.
This particular lamp has two teeny screws. Unscrew 'em and open the puck to reveal the battery:

Anemic battery (yellow) - Dump it!
Better Battery on the right
Better Battery on the right
Now I should note that the overall construction on my Dollar Tree lamp was... Well, it's a Dollar-Tree Made-In-China piece of crap! There are little clips at the top and bottom of the battery that wanted to pop-out while I was replacing the battery. It required a little dexterity, but wasn't too difficult to complete the battery swap. You do need the clips in place, and in contact with the battery terminals, otherwise it won't light up. Put the thing back together and you're ALMOST done!
Cost so far: Figure $3.00 (I'm still at $1.00 'cause I already had the batteries!)
Okay, next is fitting the "puck" into the mason jar ring. Dollar Tree does carry mason jars, but I think the ring-opening on the top is a squee-bit bigger than the standard Ball/Kerr jar rings. It really doesn't matter - as long as the puck is a fairly close fit. You're gonna tweak-it larger by running electrical tape around the outside of the puck. For mine, 4-5 layers of tape got me a good snug fit:

Dollar Tree sells electrical tape - Bada-Bing!
Next, you''re gonna want to snugly-fit the tape-wrapped puck into the top of your mason lid/ring and screw it onto the jar. Now, depending upon whether you get rain in summer (not-so-much in parched California!), you might want to run another round of electrical tape at the point where the light-puck meets the jar-ring - to keep water from getting inside. I don't think that water would hurt the light, but I would imagine it could get pretty "funky" in there if water got inside the jar.

Easy Peasy!
Cost so far: $4.00 (assuming you bought the jar at Dollar Tree - and I'm not counting the electrical tape in the cost)
So this is "okay" right now, but it's not gonna shine very brightly without something to help diffuse the light. As I'd mentioned earlier, you could just use the lamp-cover/diffuser that came with the lamp. I had originally considered buying a can of glass-frost spray at Home Depot, but my Dollar-Tree Compadre, P, came up with the brilliant idea of using glass pebbles in the jar (from Dollar Tree - Heyo!).
So, fill your jar almost-to-the-top with glass blobby-pebbles. A pint-jar will use almost two full bags of pebbles. And I would suggest using "mostly" clear pebbles, with maybe a few scattered colors. You'll see, later, how the different color combos worked out, after dark.
Here is the first lamp, filled with mostly aqua-colored glass blobs:

Purdy!
(but not very bright, unfortunately)
(but not very bright, unfortunately)
Total Cost: About $6.00 apiece (Lamp $1 + Battery $2 + Jar $1 + Glass Blobs $2) :-D
Okay, more pics...
Here are two jars - out in the sunshine. The one on the left is the mostly-aqua blobs. The one on the right is all-clear blobs in a blue jar. The one on the right also has the "extra" electrical tape (for waterproofing), but I did a sloppy job with that (which is why I decided it wasn't necessary in parched-California!).

Even Purdier!
Oh, and they are definitely NOT
gonna tip-over in the wind!
What was interesting: I played around with the clear-blob lamps, after dark, and I really didn't notice a difference between clear-blobs in a blue jar vs. clear-blobs in a clear jar. So if you want "pretty" in the daylight, and decent lighting after dark, use the blue jars with clear-blobs. The colored-blobs really do cut-down on the amount of light, so I recommend sticking with clear-blobs, and maybe toss in a few random colored blobs for interest...
Okay, most of my "after-dark" pics were pretty crappy and, honestly, they aren't super accurate. The camera compensated with a long-exposure so the pics appear brighter than they are in person. Nevertheless, here are some pics:
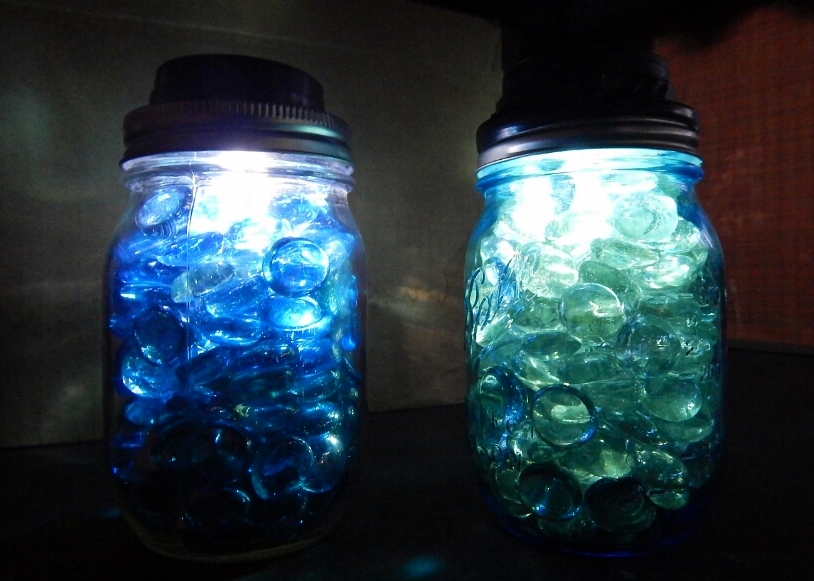
Left: Aqua Blobs in Clear Jar
Right: Clear Blobs in Blue Jar

Left: Same as above
Right: Clear Blobs in Clear Jar
(not much difference)
Then, since I'd run out of glass blobs, I decided to make one more - using the plastic diffuser thingy from the original Dollar Tree Lamp. Here are 3 together - next to the Doggie Door:

Left: Aqua Blobs in clear glass (least light)
Center: Clear in Clear
Right: Diffuser in Blue
So there you have it! My (successful) attempt at making solar-powered mason-jar lamps for *well* under $20! I like 'em and, while they aren't super-duper-bright, they do the job! Tazz can find her way to the back door after dark! Yayyy Me!


