Saturday, January 18, 2014

Hooch Update...

...Such as it is!

And WARNING: This *may* be a bit rambly, k?!

So, admittedly, I have a tendency to go off half-cocked sometimes.  And this Hard Cider Experiment definitely falls under the heading of "Maybe you should've thought this through, first!"

Nevertheless - I figure I can always serve as a Bad Example, right?!

So I started posting my "recipe" last week.  And it was loosely-based on a recipe that I found online.  And I went all Gangbusters on it by purchasing a glass carboy and airlock and assorted ingredients, and combining everything in a kind of haphazard fashion, and - Miracle of Miracles - it behaved the way it was supposed to!  It started fermenting and bubbling and whatnot - Yay!

Well, after my initial throwing-together-of-stuff, I read thru the intertubes a little further and started second-guessing myself.  End result being: "Hmm. Maybe I should've used more sweetener.  Oh well!"

So the brew has been burbling most-happily all week long and yesterday, I noticed the burbling started to slow down (and, as of this morning, it had mostly stopped!).  In other words, fermentation was pretty-much complete.  But the contents of the jug were still *quite* opaque and I figured it needed to be transferred into another container at this point - and allowed to rest for awhile so the sediment would settle - but I really wasn't sure.

Now, I absolutely ABHOR shopping (I know - weird huh?!), so most of my acquisitions arrive via Big Brown Truck - courtesy of Amazon.  But I found a [somewhat] local Brewery Supply store up in north San Jose: Beer and Wine Makers of America.  I purchased my 3 gallon carboy there and was really impressed with the owner of the shop and how knowledgeable and helpful he was.  Last weekend, there were quite a few people in his (teeny tiny) shop, asking lots and lots of questions.  I was more of an "I know what I want so I'll get out of your hair" kinda customer - last weekend!

I made another trek out there, yesterday afternoon.  Thankfully, I was the only customer, so when he asked if he could help me I was all "Yeah, I bought a 3 gallon carboy from you, last weekend, to make a Hard Cider/Meady/Apple Cyser Brew and it's been bubbling quite merrily all week long.  But now the bubbling has stopped and I think it's time for me to do something else.  What's next?"

Well sh*t-howdy if he didn't tell me!  I pelted him with dozens of questions - including expressing my apprehension about not using enough sweetener. "How much did you use?" "2 lbs of honey per gallon of water, plus about half-a-gallon of cider" to which he agreed "Yeah. Your cider's gonna be bone dry." (Oops).  Also - there's not much I can do about it now, but he said I can add honey when I serve it.

(But for future Cysers, he suggested doubling the quantity of honey to 4 lbs. per gallon)

I expressed a desire for it to be sweeter and carbonated.  Apparently 'sweeter' isn't likely to happen at this stage of the game (apparently adding more honey will kick-start another fermentation which, I gathered, was not a good thing).  But I can increase the carbonation by adding corn sugar at a rate of up to 1 cup per gallon...

He also shared a few other helpful hints (that I can't recall, offhand), but the general gist I came away  with was:  Seems like Hard-Cider was probably a good choice for my first attempt at brewing.  Evidently it's pretty difficult to f**k-up hard cider - whereas, with beer, there's apparently a million-and-one things you can do to f**k that up.  So "Yay Me" for starting with hard cider, right?!

Okay.  So enough yammering.  What's going on with the Mad Scientist Experiment???

Well, I was right about needing to do something when the burbling stopped.  It's now time for a secondary fermentation.  I held onto the round glass bottle that the Martinelli's Cider came in, and I also picked up two more 1-gallon glass jugs at the brew shop.  I also picked up a couple more airlocks and a siphon (and bunch of other sh*t because I think I'm gonna attempt ***GASP*** Beer-Brewing, next!).

So today I sanitized everything.  Then I took another hydrometer reading:

I must shamefully admit that I have NO idea what this means (YET!)

Then I sanitized everything and siphoned the brew out of the 3-gallon carboy, and into 2 x 1 gallon jugs and 1 x 1/2 gallon (appx) jug.  And I think (but I'm not sure) that's called "racking."  Anyway, we are going into "2-stage fermentation" (I'm pretty-sure that's correct!) (I really need to read Hub's book on brewing - if only so I can sound somewhat-intelligent!!!)

I discovered that the whole "siphoning" chore is actually a 2-person task (just to get it started, anyway).  Thankfully, the beer-making kit has a wand-thingie that shuts-off the siphon if it's not pressed against the 'receiving' bottle.  So anyway, I siphoned-off most of the brew - being careful not to stir-up the yeasty sediment (yeasty stuff was about 1" deep, on the bottom of the carboy).

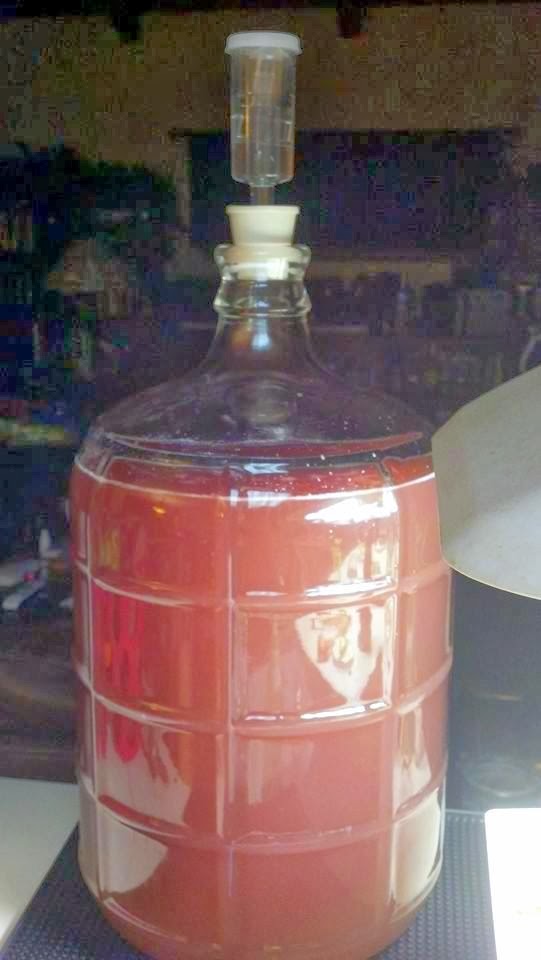
Hey - at least it's a pretty color, right?!!

I did sample a taste of it (poured the test-brew from the test-tube into a glass) and Hoo-Boy!  Yes, it is DRY!  (I suspect I'll be drinking "spritzers" with 7-Up!).

I did mix-up 1 cup of corn sugar (from the brew-shop) with 1 cup of bottled-water + a splooge of honey.  I divided the add'l sweetener "somewhat equally" into the secondary containers.  Then I popped airlocks on the top and we'll see what happens (presumably, the additional sweetener will increase carbonation - but not sweetness).

Now we let it set for a few more weeks.  No clue what's gonna happen next, but This Is An Adventure, right?!!!

(Yeah. Whatever!!!)

So there is an update on my latest Wild Hair...  More to follow, I'm sure.

(including a future attempt at beer-making.  I bought Hubs a beer-making kit a couple of Christmases ago - but it's been sitting in the box ever since.  I've used some of the beer-making components for my Cyser, but I picked up actual beer-ingredients yesterday so I may attempt that in the not-too-distant future).

Monday, January 13, 2014

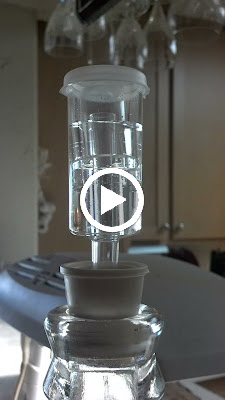
Fermentation is Happening!

I have no clue if this is gonna work, but here goes:


Why yes, it *is* rather like watching paint dry!

Nevertheless, I'm excited 'cause it means my concoction is fermenting so "Yay Me!"


Sunday, January 12, 2014

Zombie Killers! (Recipe: Cherry Apple Cyser)

Yesterday we had some business to attend to in Gilroy, and on the way back, Hubs announced that he was hungry so "Let's grab some lunch."  Morgan Hill is kinda/sorta 'on the way' so I squealed "TRAIL DUST!"  which is my absolute most-favorite BBQ Joint in the Greater Bay Area.  Their BBQ is the Real Deal (and you can smell 'em from a block away!).  Orgasmically delicious food!

Their menu is pretty limited, but their Beer Menu is incredible and we usually need at least 10-15 minutes to decide what we're gonna drink.  Well yesterday I tried something new: B. Nektar Zombie Killer Cherry Cyser.  It's kind of a cross between a hard-cider and a mead.  Pretty sweet and 100% delicious!

Zombie Killer!

My initial* Google Searches led me to believe that it couldn't be purchased around here, so I found it odd that Trail Dust served it.  But it was sooooo good, I decided I'd attempt to make it myself!

(*subsequent Googling revealed that it is carried at a handful of liquor stores in the area - Yay! Might have to seek it out - if only for comparison purposes)

So then I asked Google to tell me what the hell a Cyser was.  I figured it must be similar to mead (it is quite sweet, and lightly carbonated), and Google told me that yes, in fact, it *is* like a mead, in that it is basically a hard-cider made with honey (whereas mead is simply wine made from honey - Learn something new every day, right?!).  Google further told me that it was comparatively easy to make (Yay Google!).

Here is where Google sent me.  And here is another really, really good page.

I snooped through a couple-three additional sites and finally decided that the best way to tackle this was to simply DO IT.  Hubs has some beer-making equipment but, unfortunately, very little would be usable for my first attempt at brewing.  So I hit the local Brewery Supply in downtown SanJo.  Picked up a 3 gallon glass carboy, an airlock, and some Mead Yeast (and nutrient/booster stuff for the yeast). Then, a quick trip to the health-food store around the corner to procure local and/or organic ingredients.

Organic tart cherry concentrate
Raw, unfiltered local honey
Martinelli's apple juice
Shiny new carboy in the back

Now, before we go much further, let me start with the requisite disclaimer that I truly don't know what the hell I'm doing (and may well be doing it all WRONG!).  So if you decide you want to try this recipe, I make absolutely NO guarantees of success - k?!  Feel free to consult Google yourself or - better still - maybe read a book on the subject (I skipped that step!).  This is simply what *I* did.  I'm hoping I'll have results in approximately one-month and MAYBE I'll even post an update in a semi-timely fashion (UNLIKE my Limoncello Adventures!).

Okay?  Ohhh-KAY!  Here goes:

QT's Interpretation of a Cherry-Apple Cyser
Yield - almost 3 gallons, I bet'cha!

Ingredients
  • 2 gallons distilled water
  • 4 lbs local raw honey
  • 64 oz organic apple juice (no additives or preservatives)
  • 10 TBS organic tart cherry juice concentrate (bought it at the Health Food Store)
  • 1/2 tube of mead yeast (from the brewery supply) 
  • 2 tsp yeast nutrient (also from the brew-shop)
  • 1 tsp DAP (yep, brew shop)
First, take your yeast out of the fridge and let it reach room temperature.

Next, sterilize EVERYTHING that will come in contact with the brew.  Hubs had some sterilizer in his beer-brewing stuff (some kinda "no-rinse" variety that just needed to be mixed with warm water and swished around a bit) (I *did* end up rinsing it).  I used a 3-gallon glass carboy.

Then you'll want to mix the honey with the water.  I ended up doing this in batches, on the stove, in my enamelware pot (you'll want to use a non-reactive pot, I'm pretty-sure!).  I mixed appx 1/2 gallon of warm water with 2# of honey on low heat (just enough to make sure that the honey is well mixed), then pour into your carboy.  Do it again.  Try not to drip honey all over EVERY SQUARE INCH of your kitchen (Yeah, good luck with that!)

Then add your juices to the jug.  Notes on the juices: you can certainly tweak-around with the ratios and you may not be able to find "cherry concentrate" (honestly, I would have preferred Tart Cherry JUICE, but dealt with what I was able to find at the health food store).  I think the main thing here is making sure that the juices do not have any additives (i.e. citric acid/vitamin C or preservatives).  I suspect that additives/preservatives will impede fermentation (but, again, I have NO CLUE!)

Next, mix your yeast and the boosters/nutrients/yada-yadas according to package directions.  Unfortunately, my packages did NOT have directions, so I just stirred them into 2 cups of lukewarm water and stirred the hell out of it  Dump that into the carboy as well.

Now the FUN part - try to make sure everything is well-mixed.  I ended up putting a regular cap on the top of the jug and kinda leaned/twirled it around 'til the color looked pretty uniform.

Next, I took a small sample of the juice mixture, plopped it in a tube and floated our hydrometer in it to get an initial reading (Note: I should have done this BEFORE adding the yeast + yeast booster/nutrients) (this is just the first "Oops" of many!).

It's slightly above the 60 mark.  I think it might be 1.08 "specific gravity"

This is something I'll have to research further, but the general gist is that you subtract your "after" reading from your "before" reading, and that tells you how much alcohol is in the final product.

Anywaaaaay...  Last thing you do is seal the carboy and install the airlock (Note: Fill the airlock to the fill-line - I just poured in a little bit of distilled water).  As fermentation begins, pressure will build in the carboy.  The airlock is essentially a one-way valve that will allow the excess pressure to escape without allowing bacteria to enter.

Now, I just need to sit back and wait.  The airlock should start showing bubbles after a few hours and in a few weeks' time, I should have some Apple-Cherry Cyser to sample.  Can't wait!!!

Sorry for the crappy Droid pic - but here it is!

The Cyser is brewing on the bar and is *quite* visible.  This one shouldn't take 4 years like the Limoncello did!

Stay tuned - I'll post an update when it's done!

Updates: I think I may pop back to this post, from time to time, and add updates as they relate to "starting" the wine.  I'll probably end up posting a "Final" recipe after everything is done.

1/13/14:  I've added a link to a super-good Mead site with different recipes/variants.  Also, forgot to mention that you need to add some kinda liquid to your airlock (fixed!).  Speaking of airlocks, I am happy to report that - as of this morning (day after starting this mess) - I'm seeing some bubbles, so that means that fermentation has begun - Yay!


I'm kinda scatterbrained! (Limoncello Recipe Follow-up - 2+ years late!)

A long time ago, in a galaxy far, far away...

I wrote this post.

And the original recipe (linked in the aforementioned post) said something about "the longer it ages, the smoother it gets."

Well, "out of sight, out of mind," as they say.  I put it in the back of the closet and promptly forgot about it!.  So the tequila-bottle full of lemon zest and 100-proof vodka has been aging in our closet for, ohhhhhh, a LONG time!  So it oughtta be REAL smooth, right?!

I forgot to snap a pic of it when I first extricated it from the closet, but it looked a lot like this:


Except the bottle was still full of yellow vodka, and the no-longer-yellow zest had all settled to the bottom.

Anyway, I pulled up the original website and followed the directions from there...  Filtered out the lemon zest, and then triple-filtered it with coffee filters.  Then I made up a batch of simple syrup (5 cups filtered water, 3-1/2 cups white sugar) (not gonna attempt a low-carb variant at this point).  Combined the syrup with the lemon-vodka.  Mixed well, then decided to pour it straight into my sterilized bottles (rather than hold it in a jug, then decant).

Now it looks something like this:


I ended up with two one-liter bottles (the swing-cap bottles that I found at IKEA), one 750 ml bottle (I reused a Captain Morgan bottle), and 1 eight-oz canning jar (not pictured) full of Limoncello.

Now I think it needs to age a bit more at this point.  The original website said 45 days, but I'll probably sneak a taste after a month.

Annnnnd...  I've moved the bottles into the den (which is a pretty-dark room most of the time) so HOPEFULLY I won't forget 'em!

I hope to post an update whenever I give it a taste - but I am pretty optimistic that it will be delicious!  It certainly smelled lemony (and the color is gorgeous!).

It will be an "occasional" treat (owing to the sugar-content), but I bet it will be wonderful in the summertime!

And my next "Wild Hair" Culinary Adventure may (or may not) be an attempt at making Apple Cyser - which is sort-of a cross between hard-cider and mead.  Had some with lunch, yesterday, and it was amazingly delicious - and Google leads me to believe that it's not too difficult to make!


Wednesday, December 25, 2013

'Twas a Crock Pot Christmas... Recipe: Lazy-Cheater Turkey Ala King (with a Holiday Twist!)

Hubs and I have been busy "sharing" a head-cold back-and-forth.  "Sharing is Caring" and all of that, right?!

On top of that, Hubs had some dental work done, recently, which is interfering with his ability to eat traditional holiday treats.  So my original idea of cooking a standing rib roast in the Big Easy outdoor cooker kinda got nixed.

So yeah, I'm sniffling and sneezing and - to be honest - I wasn't really relishing the idea of being chained to the kitchen for HOURS on Christmas day.  Hubs sounded rather dismayed when I announced that I wasn't planning on any kind of huge Holiday Feast, but I assured him that I would come up with *something!*

And *something* included a trip to Boston Market for a "Family Meal" of Turkey (+ sides), and a pre-cooked bone-in turkey breast from the grocery store (from the deli - near the hot rotisserie chickens).  I bought these items yesterday, and just kept 'em in the fridge for preparation on Christmas Day.

Here's what I came up with:

Turkey Ala King in the Crock Pot

QT's Lazy-Cheater Turkey ala King (with a Holiday Twist) over Patty Shells
Yield: I don't know yet, but probably enough for at least 4 people!
Update: This made a boatload of Turkey-Stewy-Stuff - Figure it'll serve 8+ (plan on 2-3 Patty-Shells, per person)

Ingredients:

  • Appx 25 oz. of turkey breast meat (I honestly didn't measure - but I used all of the meat from the "rotisserie" turkey and most of the meat from Boston Market* (kept a few slices for turkey sandwiches, later!).
  • 2 stalks of celery
  • 1 medium onion, finely chopped
  • 1 TBS extra virgin olive oil
  • 1 can of Cream of Chicken Soup
  • 1 can Cream of Celery Soup
  • 1 can Cream of Mushroom Soup
  • 1 can of Chicken (or Turkey) Gravy
  • dash or three of Bell's Turkey Seasoning (or whatever poultry seasoning you have - I'm partial to Bell's because it's heavy on sage and tastes like "Thanksgiving!")
  • 1/2 c Craisins (That's the "Holiday Twist!")
  • 1/4 cup cooking sherry
  • 1/4-1/2 cup heavy cream
  • 1 - 10 oz package frozen peas/corn
  • 2 packages Puffed Pastry Shells (or serve over rice or noodles)
*Notes on Boston Market - I don't know if it's "just me" or if their stuff really is super-salty!  I would be inclined to stick with low-sodium soups if I was using *just* Boston Market Turkey.  I still ended up adding 2 tsp of Splenda to cut-down on the saltiness of the sauce.

Instructions:

  1. I started by sauteing the chopped onion and celery, lightly, in olive oil - just enough to get 'em limp and translucent, then I plopped 'em into the crock pot.
  2. Then I chopped the turkey meat into 3/4" chunks, added that to the crock pot as well...
  3. Next, I dumped everything else - except for the cream and frozen veggies - into the crock pot and cooked it on low for ~2 hours.  Just enough to warm everything up - then I switched it to "Keep Warm" (since I really don't need to "cook" the meat any further!).  It sat there on "warm" for most of the day (I'd say roughly 3-4 hours), 'til we were ready for dinner (and THIS is why I love-love-love my crock pot!)
  4. Appx 30 minutes before serving, I will add the frozen veggies and cream, and switch the crock-pot to High while I bake the Patty Shells (Pepperidge Farm Puffed Pastry Shells from the freezer section of the store - near the pie crusts and Phyllo dough).


After that, we shall eat (hopefully I can snap a picture first!).  I think this will be a tasty meal - on it's own - but we've also got the Boston Market side-dishes to nosh on.

I'll report back later on...  After we've eaten!

Update: Dinner was delicious!  The Turkey Ala King was a good, tasty, stick-to-your-ribs kinda meal.  I might bump-up the Craisins to get a little more Holiday "Zing" next time - but overall, it was quite yummy!

Whoa! Two posts in one day?!  Merry Christmas!!!

Update (again!!) Dec 26:  Oh. Em. Gee!  Something amazing happened to the dish, after it spent the night in the fridge.  The flavors have melded so very nicely (which means I take-back the comment about adding more Craisins! It's totally not necessary!).  The only downside to eating it as leftovers - is that the peas and carrots have started to look like they've been cooked to death...

So - what adjustments would I make for next time?!  Ohhh, I think I'd do everything the same - making the King-Gloop a day early, but I wouldn't add the frozen peas/carrots or cream until just before serving.  So yeah, make the gloop a day early, refrigerate overnight, then re-heat (stove top or crock-pot) and add the froz veggies/cream 30 minutes before serving...

Annnnd...  Since we have an abundance of leftover gloop (and Hubs has an aversion to eating leftovers), I suspect there will be a Turkey Pot Pie in our future!


Happy Holidays! Recipe: Scrumptious (and EASY) Polish Golabki / Stuffed Cabbage in the Crock Pot

Heydy Hi There!

Wow.  Time sure flies, doesn't it?  I turned my back for 5 minutes and look at that - it's Christmas already!

I get weekly stats from - someplace?!  I dunno! - anyway, I get a weekly email that tells me how many "hits" this blog receives and - given the surge in page-views during the holidays - I can only assume that *somebody* is looking for recipe ideas!

And I have been really-really bad about adding new recipes to the blog.  OTOH, I haven't really come up with anything particularly Exciting and New, either.  In fact I, myself, relied on this very blog for our Thanksgiving Repast (love-love-LOVE Pioneer Woman's turkey brine - Ahhh-mazing!)

(And now I'm thinking "How cool would it be" for me to figure out how to link to a "printer-friendly" recipe hoo-haw..?  Yeah. Pretty cool, but......)

Okay, well, not gonna get all rambly today, but I DO want to post a new and exciting and ridiculously easy recipe that got RAVE reviews from the Spousal Unit.

I'd read some post on Facebook where somebody said something about having Cabbage Rolls on Christmas Eve.  Then somebody else replied that Cabbage Rolls for dinner was, like, their annual Christmas Tradition.

I guess we could try a new Christmas Tradition, right?

"Ohhhh Gooooooogle?!!!"

Here is where I started:  Cabbage Rolls II Recipe.

Image Credit: Allrecipes.com 

And here is what I ended up with:

QT's Golabki / Stuffed Cabbage Rolls in the Crock Pot
Yield: Appx a dozen cabbage rolls which should feed 3-4 people
(Although Hubbie scarfed-down 5 in one sitting!)

For the Cabbage Rolls:

  • 1 large-ish head of green cabbage - cored and lightly steamed
  • 1 lb extra-lean ground beef
  • 1/2 package Uncle Ben's Ready Rice - Butter and Garlic Flavor* 
  • 1 medium onion, finely minced
  • 1 (14.5 oz) can diced tomatoes (including juice)
  • 1 egg
  • appx 1/4-1/3 cup bread crumbs
  • 1 envelope Lipton "Recipe Secrets" Onion Mushroom Soup
  • 1 tsp Garlic powder
  • 1 TBS Worcestershire sauce

*I used the whole package (2 cups) of rice for the first batch.  It was waaaay too ricey!  1 cup should be plenty.  Oh, and you don't HAVE to use Uncle Ben's, specifically (I did - because I'm lazy and I had it on-hand!).  Any rice will do (Ooh - Rice-A-Roni, maybe?!) - just make sure it's cooked before you make the stuffing!

For the Sauce:
  • 2 (8 oz) cans tomato sauce
  • 2 TBS Splenda Brown Sugar Blend (or use regular brown sugar)
  • 2 TBS lemon juice
  • 1 TBS Worcestershire sauce
  • 1-2 TBS red wine vinegar
Instructions:

Cut the core out of the bottom of the cabbage and steam for appx 5 minutes.  Or you can attempt to remove the outer leaves and place them in boiling water for appx 2 minutes.  Basically, you want the leaves to be limp enough to wrap around the filling without tearing or breaking open.  I chose to steam the whole head - and it worked great.

Chop a medium onion (or use dried, chopped onion if you prefer).  

Dump everything - except the cabbage and sauce ingredients - into a large bowl and mix well.  I find it's best to use your hands, but you may find that's too gross!  Anyway, mix thoroughly.  Then scoop appx 1/4-1/3 cup of meat-rice mixture into each of your cabbage leaves.  Roll the cabbage leaves from the bottom, fold in the sides, and continue rolling 'til the stuffing is completely encased, burrito-like, in the cabbage leaf.  Put the roll directly into the crock pot (with the seam-side down).  Repeat til you have one layer of cabbage rolls in the bottom of your crock-pot.  Sprinkle lightly with sea salt (I used garlic sea-salt).

Keep making cabbage rolls and add a second layer in your crock pot.  Sprinkle with salt again...

Mix up all the sauce ingredients in a smaller bowl, or saucepan if you prefer (I didn't find it necessary to heat it - the sugar blended into the sauce just fine on it's own).  Pour the sauce over the cabbage rolls in the crock pot.  Cover and cook - Low for 8-9 hours or High for 5-6 hours

This is one of those recipes you can play around with.  Add or subtract ingredients as you see fit. But I think I'd definitely stick with Extra-Lean Ground Beef (otherwise, it'll be too greasy and gross).   I think the "key" to this recipe's success is the tangy-sweet tomato-y sauce so I wouldn't change much, there.  I doubled the sauce from the original recipe and that seemed like just the right amount.

Definitely a delicious meal that Hubbie raved on-and-on (and-on!) about.  Hubs is half-polish and I learned that Cabbage Rolls are also known as Pigs-in-a-blanket or Golabki (in Polish).  Turns out his mom and grandmother made this when he was a kid and - I'll be damned - turns out this recipe tastes almost exactly the same!

So Yay Me - and Yay for new Christmas Eve Traditions!

Hope ya'all are having a simply stupendous Holiday!  I am - and I may even have a few more recipes to post (Heyyyy!)

xoxo

-QT

Sunday, October 13, 2013

Bienvenida a Estados Unidos! (GGW 13)

Whoops.  Had to take a little side-trip there!

Just got back from sunny (well, sunny with occasional thunder-showers) Mexico.  Girls Gone Wild - 2013 Edition!

This trip was, pretty-much, a carbon-copy of last year's trip (in terms of where we went, what we saw, and what we drank - err - ate!), so I'll just link to last year's slide show post (which I never did figure out how to embed!!!)

Random Mexico Photos

Okay now, requisite disclaimer:  This is post is gonna be mostly-rambly. Consider yourself warned!

This year's trip was quite a bit different, in that it was something of an Emergency-Emotional-Support trip.

See, ever since Hubs and I went to visit them, and we discovered that Hubs really doesn't like the Mexican Ex-Pat Zone (Lake Chapala and surrounds), we girls decided that GGW Weekend needs to be an Annual Thing.  No Men Allowed is what I'm sayin'!

So the original plan for GGW Weekend (Maiden Voyage - 2012), was for the girls to ditch their spouses and spend a 4-5 day weekend catching up, perusing Artsy Fartsy zones, and yakking endlessly in Girl-Speak (mind-numbingly dull for the spousal units!).  In fact, last year, D's husband had flown back to the states - just so we girls could have our "Hen-Fest."

So this year's trip has been "cooking" since March (when I purchased the airfare).  In the meantime, D lost her husband most unexpectedly.  That was a total shock and major blow to D:  I mean, he was many years her senior - and plagued with (hereditary) cardio-vascular issues - but he was also the poster-child for good, clean, healthy living.  Seriously, he was like Mr. Iron-Man Triathlete, right?!  So, on his last day on earth, he awoke to watch the Tour de France.  Did his usual 100 push-ups and 100 crunches and - no doubt - ate a light healthy breakfast of fruit and granola (or something), then went on a 2-1/2 hour bike ride (Basically - just another normal day for them, right?).  Well, when he got home, D greeted him as he was walking his bike back into the house.  Next thing she knew, he was slumped-over, lips turned blue and in an instant - he was gone.  He died right in her arms.

I mean, it was as beautiful as something-like-that can be - but HOW TRAUMATIC!

In the weeks following his demise, D had been very busy handling legal affairs, estate settlements, planning "Send-off Parties" ("Celebrations of Life" whatever you wanna call 'em), in multiple countries/states (They were quite the "Movers and Shakers" - back in their busy-career days).

Through it all, she had many friends, neighbors - Gringos and Mexican nationals alike - offering her food, support, rides to wherever (and more-than-a-few scumbags of-the-male persuasion who actually "hit on her" at her late-husband's celebration - Urgh!) (She is incredibly gorgeous and, at age 50, she is comparatively young amongst the Ex-Pat population - therefore, quite a "catch" in her own right!).

Annnnnywaaaayyy...  Tactless Scumbags aside, she really does have a good support network down there - is what I'm sayin'.  But in the weeks after her husband's passing, she relied most heavily on daily phone-calls with her mother - back here in the states.  Welllll...  Just a few short weeks after her husband's death, her mother's health took a turn for the worse.  Her mom passed just 6 weeks after her husband.

So the "tone" of my upcoming Mexican Fiesta had changed significantly.  First, I wanted to confirm that it was still okay for me to impose upon her hospitality during this difficult time - to which she replied "Are you KIDDING ME?!  You are my beacon of hope!" (or words to that effect!)

So long-story-short (Too late!!!), much of the weekend was spent reminiscing about all of the good (and bad) times...  Many tears were shed...  There may have been a Complete Nuclear Meltdown at one point...  Then, a little bit of gentle "Butt-kicking" was in order (since my friend had found herself on a bit of a self-destructive path - understandable, given the circumstances).  Toward the end, there was definitely more laughter than tears, and I'd like to think I played a small role in getting her pointed back in the right direction.

And I feel good - for having had the opportunity to help a very good friend through a very rough patch.

Secondary to all of that: I feel good because - prior to my trip - I had gotten a steroid injection.  That, unfortunately, seems to be the only thing that kicks my skin condition to the curb.  Not really a viable long-term solution, but I'll take it for stuff like international vacations - just to ensure that I am able to walk and function like a normal person.

I'm rather enjoying this whole "normal" thing - now that I'm home.  I've actually been able to do crazy stuff like: "I think I'll check out the Saturday Farmer's Market" and just put on a pair of shoes (Yes, SHOES!), grab my car keys and go.  Or "Gee, we're out of milk" and - again - slip on some shoes, hop in the car and go.  Or, crazier still:  "I think I'll go out and tidy up the garden" (Gawd, that sounds so refined, doesn't it?!).  So I ripped out the last of the tomato plants and assorted summer veggies (left the pepper plants - they've still got some fruit that's almost ripe).  Filled the green-bin, I did!  And that is pretty damned cool if you ask me!!!

(Srsly - this really is a "treat" for me right now - to be able to walk without pain!)

Oh how I wish we (the doctors and me) could find a REAL solution to this completely f**ked-up condition!!!

Anyhoooo...  Sorry for the rambling, but I really wanted to take a minute to kind-of "count my blessings" - as it were.  Normally I absolutely HATE this time of year.  Autumn with it's shortened days, and cooler nights *always* brings me down!  But we are having an absolutely breathtakingly beautiful Indian Summer, this October (Jeez!! October already?!!).  I am up and walking - and I intend to squeeze every last micron of Vitamin D out of whatever sunshine we have left, right?!

And with that, I will add one picture of a couple of Talavera Planters that I picked up in Tonala, this last trip!


Adios!  And I hope to get back to posting bona fide "content" someday soon...!


View my page on Meet the Phlockers