Saturday, March 31, 2012

New "Content!" Ceramic Stuff and Master Gardeners Mayhem!

Minimal Ramblings and Mostly Content - Hey!!!

So last weekend, P and I went to a "Build A Birdhouse" Workshop at another local studio. I figured I could post pictures of what I made - just for sh*ts and grins:

Birdhouse #1: Tiki-Shack
(No surprise there!)

Birdhouse #2: Normal Birdhouse
(Yawwwwwnnnn!)

Birdhouse #3: Outhouse
Complete with toilet!
(Yes, the other students thought I was nuts - but yes, they laughed!)

Templates for birdhouses - cut out of roofing tarpaper
(P snagged copies of them - Yay!)
(And yes. I will be making more birdhouses)

So - that was LAST weekend. Pieces aren't done yet - we'll stop by the studio, next week, to glaze the pieces for final firing...

* * * * *
THIS weekend, we attended the annual Santa Clara Master Gardeners Spring Sale. We kept an eye on the weather (rains predicted) and hoped that the turn-out, this year, would be fairly light...

As we were driving to the sale, the skies began to darken, but the streets remained dry. However, as we got closer, it began to sprinkle...

When we first arrived (about 20 minutes before opening-time), the line stretched "only partway" around the block. This was certainly an improvement over years' past - but we still had plenty of "Hardcore" Gardeners to contend with!!!

And - just FYI - the way to tell the "Amateurs" from the "Hard-Core Crowd" is that the "Seasoned Professionals" know to bring some kind of cart for toting their purchases (and the Amateurs have that whole "Deer in the headlights" look!). To be fair, the Master Gardeners *do* provide boxes near the entrance, but the boxes are ENTIRELY insufficient for transporting acquisitions (which must be attained through elbowing/eye-gouging or ANY MEANS NECESSARY) from the tables to the check-out line!

Protective Gear is advisable!

Anyhooooo.... We parked, and waited at the truck 'til the line dispersed. Then we joined the Mad Horde:


Line, waiting for the last gate to open

The gate opened (to a loud cheer and applause) and quickly moved into the main sales area... This is the point where it's advisable to "Divide and Conquer!" (As in: "Okay, you go to the Peppers: I want an Ancho Poblano, Anaheim, JalapeƱo and Red Beauty. I'll hit the Beefsteak tomatoes first, then the Pastes, what do you want?" "I'll meet you at Cherry Tomatoes!") We didn't employ these More Advanced tactics (Others did! I swear!) - but we did split-up, briefly!

And THEN the skies opened-up. Good GAWD did they open! You know how I'd been p*ssing and moaning about the paltry-pathetic-pissy rainstorms we've had, so far, this year? Well, this was a bona-fide deluge - dammit!

Tomato Alley - at the beginning of the rainstorm

Well, we were there and - by Gawd - we were GONNA get our veggies - dammit!

Of course, BEFORE the sale, P had proudly announced that she was gonna buy "Only Six Plants." I referenced last years' Garden Sale "Plans vs Actuals" on Facebook (where she had announced that she was only gonna buy FOUR plants) (and ended up with 18!).

This looks like more than six plants!

I had predicted "13" - but she ended up with 14
(+ 3 more purchased at the outside vendor booths)

I, of course, know better than to predict that I will show any semblance of "restraint!"

My Final Haul!
Twenty-six plants
(mostly tomatoes, but plenty of beans, peppers, eggplants and herbs, as well)
(and I did pick-up a couple of add'l plants "on the outside!")

When it was all said-and-done, I looked (and felt!) like a Drowned Rat!!! I pulled the truck into the driveway so I could unload the cart from the back-seat and drag it into the backyard.

I did wait for the rains to subside before I moved "the Babies" into their Temporary Home...

Thankfully, there was a break in the rain this afternoon, and I did manage to re-jigger the greenhouse so I could move them in...

Top Row of Babies - in the greenhouse...

Second row of babies...

And I've pulled-out my Hydro-Farm Mega-Garden
and Adjustable Light Fixture.
Need to clean it out, then rig-it-up for lettuces and culinary (NOT medicinal!) herbs...
(Next Project!!!)

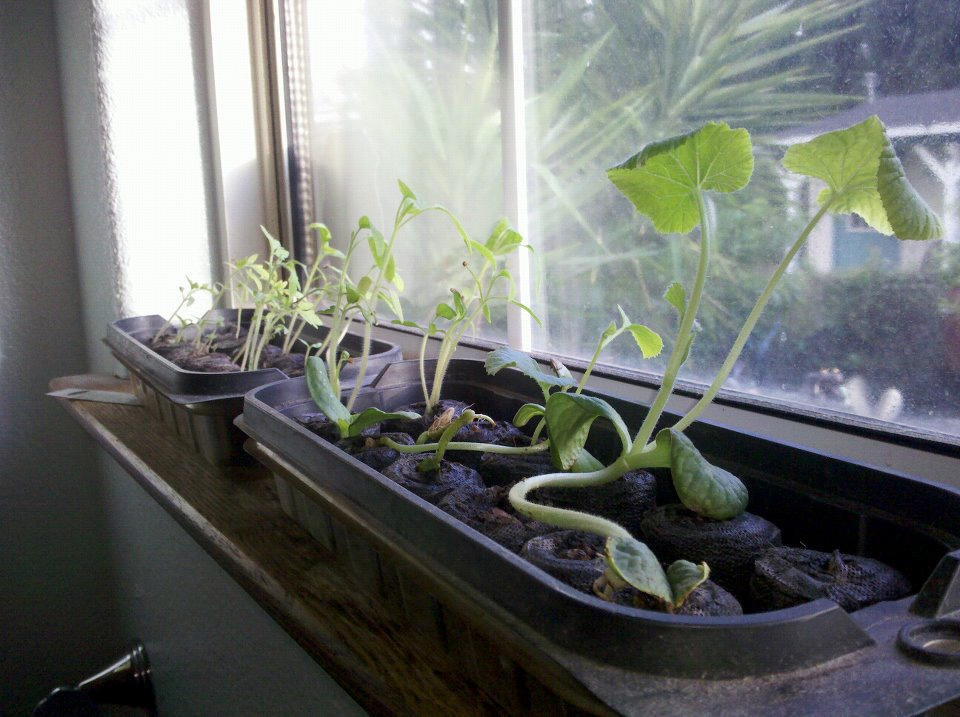
Annnnd... My Bathroom Seedlings continue to grow!

In the next week, I hope to Test and Amend my raised beds (per the links in my last post). Maybe get some sh*t moved-along in my studio (lots of "Works In Process"). Contemplate the idea of building, maybe, a third raised bed (over where the Straw-Bale bed is, now). And clean-up/set-up my hydroponic garden!

Yeah - Ambitious, I know! (and - honestly - I doubt I'll get to most of 'em anytime soon, but it's good to set goals, right?!! Or "Be delusional" - take your pick!!!)


Friday, March 30, 2012

Gardening Madness Repeat

:::whew::: I think I'm on-track!

I pulled up last year's post here and I didn't perform my Soil-Testing Ritual 'til April 8. So I'm not gonna sweat it!

Nevertheless, I felt it was appropo to re-post the link (as well as the links to Finny's most awesome instructions).

Besides, it'll make it easier for me to pull it up when I'm ready to start testing (And it's All About Meeeeeeee!!!!).

Later!


Countdown to Master Gardener's Sale...


It's TOMORROW!!!!


Am I ready? Oh HELLLLL no!!!

Good News / Bad News: It's supposed to be raining Mountain Lions and Rottweilers tomorrow! Won't be much fun getting drenched in the rain. But - OTOH - I think that will keep a lot of people away (or, at the very least, the line-to-get-in won't start forming at zero-dark-thirty!).

I have NO doubt that the hard-core gardeners will still show up (I think that includes me and P!). And I'm sure it will still be a sell-out!

Back to Preparedness: Well, I *did* start to clean-out the greenhouse - somewhat. I had to tear-down all of the bubble-wrap that I'd taped to the walls and ceiling. It was useful - back when I over-wintered my marginals in there b/c it added a bit of insulation without cutting down on the light. Since then, it's gotten to where the bubble-wrap is falling down (and there were lots of - ICK! - Bug nests in it!). I also managed to chop-back the neighbor's vine that started growing up through the floor (Oooops - maybe I should have put landscape fabric down when we built the thing).

Speaking of squatters... Once again, Momma Mourning Dove has decided to set up housekeeping in my greenhouse (I *really* need to keep the door closed on that thing!).

New greenhouse tenant

I felt kinda bad, cleaning out the greenhouse. I think I may have frightened her to the point where she will abandon her nest. On the other hand, last year, I left her alone til the egg hatched. One afternoon, I walked in there and the fledgling scared the living crap out of me (and vice-versa, I'm sure!). He flopped around inside the (open) greenhouse and eventually flew out the door. But then he managed to fly back to the "main" yard, and got trapped in the space behind our cypress trees along the fence (narrow space - not big enough for a sloppy fledgling flier) and one of the dogs got him ("Ewwwwwww!!!!!"). Yeah, I felt SUPER bad about that!

In years past, she used to build her nest up above the pool equipment, ON the solar pipes. That was fine until we actually turned on the solar-heating system (generally *before* the eggs hatched). This would cause the pipes to shake to the point where the nest (and un-hatched eggs) fell from roof-level to the ground - with devastating results.

That poor bird! She *really* needs to find a new home!!!

Oops. I'm rambling! Ahhh - but it's relevant! Spring is in the air and I simply *must* prepare for my warm-season garden!

That includes having a PLACE to put the boatload of plants I will be purchasing tomorrow... ANNNNND Finny's Maters... ANNNNNND I am thinking about starting up my Hydro-Farm Mega-Garden and attempting to grow lettuce and maybe some (non-medicinal, NOT-ILLEGAL) herbs in there...

The Mega-Garden was a Christmas gift from hubs a few years back and I actually did grow tomatoes in it, successfully, through one winter. It was a nice "novelty" - having fresh tomatoes in winter - but they ended up growing waaaaay too big to be manageable in my greenhouse (picture makeshift pantyhose "trellises" tied to eyebolts in the ceiling), and they attracted whiteflies like CRAZY.

When it was all said and done: The fruit really didn't taste all that good, unfortunately. Maters need real-dirt and sunshine :-)

We do have a hydroponic supply store - just around the corner from me. Opened just a few weeks ago, so I wandered in to check it out. They were super-nice and helpful. Although I suspect they *may* cater to the "Medicinal-Herbs of Questionable Legality" growers! They had some absolutely MASSIVE hydroponic units that would fit in this reflective "stealth" DIY grow-room-tent kind of arrangement with HID lighting and massive ventilation fans, etc ("Does she or doesn't she? Only PG&E knows for sure!").

Nevertheless, I told them about my hydroponic unit "It's about yay big, an ebb-and-flow system." "The Mega-Garden." he replied. "Yes! And I'd like to grow lettuce and culinary herbs in it" blah-blah-blah. So I picked up some little grow-baskets and rooting medium, and he suggested I go to home depot and pick-up a styrofoam sheet to make a floating rack kinda thing.
Maybe I'll post pictures of that project - whenever I get around to making it!

My challenge is going to be growing "cool-season" leafy crops in the greenhouse - knowing that summer is right around the corner. Hell, the lettuces I planted outside before winter BOLTED almost immediately after the first rain!

Anyway - that's just ONE of the MANY gardening projects on my "To-Do" list.

Another one is getting the raised beds ready. I actually did start that, last weekend (that would have been part of my Pulitzer-Prize Winning post that never got written!). I did clear approximately half of the two raised beds (including weed-pulling!). I've left the artichokes, onions and garlic in - as well as the turnips and beets (I hope they "finish-up" before I have to start planting the 'maters) (Probably around mid- to late-April). I also dumped a couple of 1 cu. ft. bags of compost on the beds.

I'm waiting for Finny to post her annual "Test and Amend" ritual - then I'll *know* it's time to test the soil. Or maybe I'll scan back and re-read MY posts (which linked to Finny's posts!) to figure out when to do it!

So yeah, need to "make the beds!"

Plenty to do - Oh My Yes!!!

Tonight.... Well, tonight I will whip out my highlighter pen and mark-up the Tomato List for the Master Gardener's Sale tomorrow. Gotta prioritize and wrestle my way through the hordes of hardcore gardeners to make sure I get what I want!!!

I am totally looking forward to it!


Wednesday, March 28, 2012

Update: Strawberry Rhubarb Jam - FAIL :-(


Welllll... For anyone hoping to find a final recipe for Low-Sugar Strawberry-Rhubarb Jam... There isn't one :-(

I tweaked around with the Freezer-Jam recipe I posted yesterday. And I used Stevia and regular sugar (about 3-to-1), but I really wasn't happy with the results.

Not sure if maybe Stevia doesn't cook well, or what. But the pectin didn't set-up properly and the jam tastes "kinda funny." Not in an "Oh My Gawd I'm Gonna Die" kinda way, but it's not as good as I might have liked...

Plus I ended up with Floatie Fruit
:::sigh:::

Soooooo... Back to the drawing board with that one!

I'll post the recipe whenever I manage to PERFECT it!

Tuesday, March 27, 2012

Recipe: QT's [mostly] Sugar-Free Strawberry Rhubarb Freezer Jam

Okay, I'm repeating myself now - but in the interest of separating "Content" from "Ramblings" I am re-posting an old recipe (originally posted here: http://imqtpi.blogspot.com/2011/06/more-randomness.html)

I'm probably gonna re-work it again into something suitable for long-term (non-freezer) storage, but here it is:

"QT's [mostly] Sugar-Free Strawberry Rhubarb Freezer Jam"

2 lbs fresh rhubarb. Cut into 1/2" pieces
4 cups strawberries, sliced and smushed
2 packages No-Cook, Freezer-Jam Pectin
3 cups granulated Splenda (+/-)
1 Tbs Lemon Juice (optional)
sprinkling of sugar (I'd say no more than 1/4 cup).

I made the jam in two batches.

2 lbs of rhubarb will yield just-shy of 4 cups of fruit - after it's cooked down. So batch #1 was probably 50/50 rhubarb and strawberries. Batch #2 was definitely more strawberries and much sweeter (hence the addition of Lemon Juice).

Slice up the rhubarb and put it in a bowl. Sprinkle a tiny dusting of real sugar on top and toss it together (the real sugar seems to help start the rhubarb "sweating"). Then sprinkle 1 cup of Splenda on top and toss it all together again. Let it "set" for about an hour so the rhubarb starts releasing it's juice. One of the recipes I'd read suggested leaving it overnight (and that might improve the overall tartness - but I wasn't that patient!).

Glistening Rhubarb (after sprinkling sugar and Splenda on it)

While the rhubarb is juicifying (I'd rather just call it "sweating!"), clean and top the strawberries. Slice them up in a bowl until you have appx 4 cups. Then sprinkle a little "real" sugar on top to get them juicifying as well. The strawberries don't have to sweat for that long, though.

Once the rhubarb started sweating, I went back and stirred it around a few more times. Then I dumped it all into a large saucepan and heated it up on low. I think low and slow is best - to facilitate releasing the juice. Eventually, the juice started to exceed the rhubarb chunks and began to boil. I kept the heat very low and stirred frequently. It all turned into a lumpy mash after about 20 minutes or so. I taste-tested it and determined that the sweetness-to-tartness quotient was just about perfect! The texture was mostly mushy with a few small (soft) chunks of rhubarb.

Yep! Perfect!
(This is the texture when it's time to take it off the stove)

Remove from the stove and let it start to cool. While the rhubarb was cooling, I started mashing the strawberries to get 'em softer. I did not add a significant amt of sugar, nor did I add Splenda to the strawberries.

Once the rhubarb mash was warm (meaning it wouldn't burn if I stuck my finger in it), I dumped the strawberries into the pot and stirred everything together.

In a separate clean bowl, I mixed 1 pkg Pectin and 1 cup of granulated Splenda. Then I added 4 cups of the Strawberry-Rhubarb mixture into the Pectin/Splenda mixture. Stirred it thoroughly for 3 minutes. Then poured the jam into 8 oz plastic freezer-jam jars, using a canning funnel. Make sure you leave appx 1/4" of space on the top because the jam will expand when it freezes.

Then I went to make the 2nd batch and quickly realized that I didn't have 4 cups of fruit left in the pot! So I quickly sliced and mashed more strawberries, and mixed 'em in with the rest of the fruit until I had 4 cups. Unfortunately, I don't have exact measurements - "Oh well!"

Anyway, I did the same thing with batch #2 (mixing Pectin/Splenda, adding fruit, mixing, etc.). I did determine that batch #2 was sweeter than I wanted, so I added a tablespoon of lemon juice to 'tarten' it up a bit!

End Result: I got 10 x 8oz jars of Freezer Jam, I did mark the jars with the different batch #'s so I can taste-test 'em later.

Yum! 1st taste test (after an hour in the fridge). Batch #1 is Perfecto-mundo!
Texture, tartness and sweetness are *just* right!
Now I wish we had some warm sourdough to serve it on!

I'll probably re-post *again* when I re-jigger this to a "Processed Jam" recipe.

(Ummm... In case you couldn't tell, I freaking LOVE Strawberry Rhubarb!)

Recipe: Low-Cook, Low-Sugar Blackberry Freezer-Jam (Stevia-sweetened!)

But first, a teeny bit of Rambling........

Sooo... Ya know what really torques me??? When I download a bunch of pictures to my hard-drive, and edit 'em and get ALL READY to type-up an Action Packed Blog Post... Then my computer decides to take a crap on me - Grrrrrr!!!

So, last weekend was jam-packed, non-stop excitement. What with the SF Garden Show (and getting TONS of CREATIVE and EXCITING ideas), then the Build-A-Birdhouse Workshop, then ACTUALLY WORKING in the garden!!!

And I'm sure I would have written a positively SCINTILLATING Pulitzer Prize-worthy post that would've launched me into Fame and Fortune, and Book-Deals, and TV Appearances, and some-such bullsh*t (NOTTTT!!!).

:::sigh:::

"NEW" Laptop is back in the shop again (this is it's second trip - dammit!), and I may insist that it get returned to Dell and be replaced with a Brandy New machine.

Phooey! I am back on Bare-Nekkid "OLD" Laptop, and I really don't want to fill-up the hard-drive with too much "stuff."

* * * * *

Okay, I promised more Content and "segregated" rambling - so let's dive into "Content" shall we?

Grocery Store had fresh berries on sale, so I loaded up on Strawberries and Blackberries. I searched - in vain - for rhubarb again. But then I settled on making Blackberry Freezer Jam.

Now, today, I had to go back to the store (different store, this time) because I suddenly remembered I was out of Pectin (Oops!). Well, the second store DID have rhubarb (Yayyy!), so I bought even MORE strawberries. Strawberry Rhubarb Adventures will follow in a later post!

Today, it's Blackberries!

I consulted Google again and found that, pretty-much, all Blackberry Freezer Jam recipes have the same basic ingredients: Blackberries, sugar and pectin. Surprise!!! (although some mentioned adding lemon or lime juice).

So I mostly stuck with the directions in the package of Low/No-Sugar Pectin (today, it was a box of Sure-Jell Brand). I wanted to stick with No-Cook Freezer Jam, but blackberries don't seem to smush quite as well as strawberries. And the "Quick & Easy Freezer Jam"instructions did call for a *little* bit of cooking...

Here is what I did. And yes, I did wander off-course, just a little! (I am *such* a rebel!)

Low-Cook, Low-Sugar Blackberry Jam
Yields appx 5-6 half-pint jars of jam
Prep and Cook Time - appx 30-45 minutes total

Ingredients
  • 4 x 6oz. baskets of fresh blackberries (ended up being almost-exactly 4 cups, after smashing)
  • 2 Tbs sugar
  • 2 Tbs lime juice (bottled, unsweetened)
  • 1-1/2 cups "Stevia in the Raw" - granulated Stevia (Yes, my first attempt at sweetening with Stevia!)
  • 1 cup granulated sugar
  • 1 package Sure-Jell No/Low-Sugar Pectin
  • 1 cup water
Instructions
  1. Rinse the berries. Remove any nasty ones.
  2. Dump them into a large mixing bowl. Smash them, a layer at a time, with a potato masher, and sprinkle (as you go) with the 2 Tbs of Sugar. Real-sugar helps the "de-juicify-ing" process (IMHO).
  3. After you've smashed the berries, use a slotted metal serving spoon to find any remaining whole berries, and smash-em up against the side of the bowl. You don't want to completely puree them, but you don't really want "whole" berries either.
  4. (Some of the recipes I read suggested running appx half of the berries thru a food-mill to remove the seeds**. I think I will try that, next time I make blackberry jam.)
  5. Add in 1-2 Tbs of lime juice and stir the smash-berry-soup one more time... Let 'em set and sweat while you prep the pectin.
  6. Measure 1 cup sugar and 1-1/2 cups Stevia into a medium saucepan. Add the powdered pectin* and mix all the dry stuff thoroughly with a fork.
  7. Add 1 cup water to the Sugar/Splenda mixture. Mix thoroughly.
  8. Heat-up on high to med-high, stirring constantly. Bring to a rolling boil and continue to stir, while boiling, for one full minute.
  9. Remove from heat and quickly dump the fruit-sludge into the hot Sugar-Pectin. Stir until well-mixed. Then stir some more (I think I stirred it for appx 2 minutes).
  10. Ladle the hot jam into clean plastic 1/2 pint freezer jars (with twist-on lids), leaving 1/2" headspace.
Let them set on the counter for 24 hours, then freeze for up to 6 months.

Okay: Crappy Droid Pics!

Getting ready for Berry Destruction!

Mmmm! Fresh Blackberries!
I actually kinda like the "dreamy" quality of this picture.
Then I figured out that maybe I oughtta wipe off the camera lens (Duhhhh!)

Smashed Berry-Soup!

I didn't snap a picture of the Sugar/Stevia/Pectin (imagine white powder, okay?!)
This is after I dumped the fresh smashed fruit into the boiling-hot pectin mixture...

*Now the Sure-Jell Instructions had dire warnings about measuring everything EXACTLY and not trying to modify the sugar content or attempt low-sugar with this method of preparation because it would result in set-failures. Mine is low-sugar and it set just fine.

All done! I ended up with five full jars (and one half-jar)

Other than being SUPER seedy, the jam is *quite* tasty! (Gonna add a Foley Food-Mill Doohickey to my Amazon Wish-List though!)

It set-up just fine and using Stevia as the sweetener tastes GREAT! Better than Splenda, I think. Definitely gonna do some more experimentation with Stevia on future Jamming Adventures!

And the Best Part of All??? Somehow - MIRACULOUSLY - my kitchen did NOT end-up looking like a murder scene! Not quite sure how *that* happened, but I'm damned happy about it! ;-)

Now go find yourself some fresh blackberries (preferably on sale) and make some of this jam!

** Addendum 04/07/12: If you decide to run half the berries thru a Foley Food Mill, plan on needing more berries. I did that and ended up with only 3 cups of smashed berries which kinda jacked-up the rest of the recipe. Suggestion: Buy 5 baskets, plain-smash two of 'em and run three baskets' worth thru the Food Mill (and plan on cleaning up a helluva mess afterward!)

Thursday, March 22, 2012

Recipe: Strawberry Freezer Jam with Moscato Wine

So my Droid has been totally p*ssing me off lately with it's antics. Camera keeps locking up, forcing me to reboot, and causing me to exhibit signs of Tourette Syndrome (more specifically, coprolalia)! (And no, I am not afflicted - but the Droid Camera can drive me to that!)

Yeah, I dragged out the "real" camera, *and* found the USB cable, *and* fired-up Picasa so today you'll be treated to DECENT pictures! (Not great... But definitely an improvement!).

Yesterday's Farm Share delivery included a small 8 oz. basket of fresh, organic strawberries (Yummm!). And my side-trip to the grocery store netted me two add'l 16 oz. baskets of (not-so organic) strawberries. But they're all local, so It's All Good!

Awhile back, I'd found a recipe for Strawberry Freezer Jam with Moscato Wine. This was "Back in the Olden Days" - before Pinterest - and I had emailed it to myself. Took a little digging, but I found it and I did, in fact, add it to my Pinterest board.

Well, tonight, I decided to make it - before I scarfed-down all the strawberries ('til I made myself sick!!!).

Original Recipe here. But, once again, I am trying to trim the carbs as much as I can, so I tweaked it.

To be honest, these strawberries (being SUPER early in the season) aren't quite as sweet as I'd like, so I did have to go kind of "heavy" on the Splenda (and I think I might start experimenting with Stevia at some point, actually). Normally, I don't care for super-sweet jams - preferring to let the fruit's natural sweetness take center stage - but this particular batch needed a little extra "Oomph!"

Mid-Summer strawberries will be a WHOLE lot sweeter, so if you choose to attempt this recipe, I'd suggest going light on the sweetener initially - then adjust as you see fit.

Nevertheless, I am pretty pleased with the end result. So I'm posting *my* version of the recipe here.

QT's Low(er)-Sugar Strawberry Freezer Jam with Moscato Wine

Yield: Appx 4-5 half-pints of jam

Ingredients
  • appx 2 x 16oz. tubs of fresh strawberries (you want to end up with appx 4 cups, crushed)
  • 2-3 Tbs granulated sugar
  • 187ml mini-bottle of Moscato Wine - sweet dessert wine (original recipe called for 3/4 cup - I ended up using the whole bottle)
  • 1/4 cup honey
  • 1/4 cup (+ appx 2-3 TBS) Splenda
  • 5-6 Tbs Instant Pectin (I used Ball brand - comes in a 4.7oz jar. No clue how many "envelopes" you'd need. Prob'ly 1-1/2 - 2 envelopes)
Instructions
  1. Rinse the strawberries. Chop off the tops and remove the cores.
  2. Slice thinly and dump them into a large bowl. Sprinkle granulated sugar on the slices, as you go (the sugar helps them start "sweating" - Splenda doesn't work as well)
  3. Keep slicing and sprinkling 'til you have appx 4 cups.
  4. Grab a potato masher and lightly squish 'em. You don't want to obliterate them - you'll want to keep some recognizable strawberry chunks - but you do want them *fairly* mushy so they give-up their juice!
  5. When you squish them, you'll end up with less than 4 cups. Hopefully you've still got more whole strawberries so go back to slicing, then squish again. Stop when you've got 4 cups.
  6. Measure out 3/4 cup of Moscato Wine. This was, basically, almost the entire single-serve bottle and - since I was already drinking a margarita - I opted to pour the entire bottle into the jam!
  7. Add in 1/4 cup of honey
  8. Stir it up.
  9. Measure 1/4 cup of Splenda and 4-5 Tbs of pectin into a separate container. Mix the dry ingredients thoroughly with a fork, then dump it into the winey-honey-strawberry soup. Mix thoroughly.
  10. Taste test it and add more sweetener, if needed. (Like I say, if these were mid-summer strawberries, I doubt it would need more. In fact, I might even *stop* at the honey stage!)
  11. Pour the jam into 1/2 pint jars, leaving 1/2" head-space. Using a ladle and funnel helps cut-down on the clean-up!
  12. Let the jam set-up at room temperature for appx 30 minutes, then label and store it in the freezer for up to 6 months.
Pretty Pictures!

Mmmm! Fresh Strawberries!
(and single-serve bottle of wine in the background)

Sliced strawberries with sugar
(Note: This bowl is a little on the small side. Go bigger if you don't want a bloody mess!)

Smashing the strawberries into soup!

All done!

Yep. This is a very tasty twist on Strawberry Freezer Jam. To be honest, I'm glad I used a little extra Moscato because you can taste "just a hint" of it. It really is *quite* tasty!

This only took appx 20 minutes to throw together so if you've got access to fresh strawberries, you have NO EXCUSE! Go and make a batch of this jam! You'll be glad you did!!!

Wednesday, March 21, 2012

Recipe: Creamy Leeky Onion Mushroom Soup with Feta

Creamy Leeky Onion Mushroom Soup


Yep. It evolved!

And I approve!

FWIW: Whenever I stumble onto a recipe that intrigues me, I "pin-it" here: http://pinterest.com/imqtpi/ (Yep, I got suckered-into the Pinterest Craze!).

So the genesis of today's recipe was "Oh, crap - I've got another Farm-Share Delivery!" Followed by "Oh, Jeez - More leeks?! I never used the leeks from my LAST delivery!!!"

I had an overabundance of leeks, is what I'm sayin'!

I also had a bag of onions that was threatening to sprout on me so I figured "Leek + Onion + Soup" was in order.


See? I'm getting lazy now and just copying/pasting links!

Anyway, it was a good starting point. Here's what I ended up with:

QT's Creamy Leeky Onion Mushroom Soup with Feta

Makes a big vat o' soup - I'm guessing 6-8 generous servings

(adjust to suit your needs/fridge contents/whatevers!)

Ingredients
  • 2-3 Tbs olive oil
  • 3 big fat leeks, dark green leaves and roots chopped off
  • 1 big yellow onion
  • 2 small-ish red onions
  • 2 cloves of garlic
  • 1 Tbs sugar
  • appx 1 cup of fresh mushrooms (I used half crimini and half plain ol' white)
  • appx 1/4-1/3 cup white cooking wine
  • 4 cups beef broth
  • (optional) 1 little envelope of beef-flavored Swanson Flavor Boost and a little more water
  • 2 bay leaves
  • 2 tsp (or more) dried thyme
  • 1/2 tsp dried tarragon
  • 1/4-1/2 cup dry red wine
  • appx 1 oz crumbled feta cheese
  • appx 1 cup heavy cream
  • Salt and pepper, to taste
Instructions
  1. Clean all the dirt off of the leeks (or as much as you can manage!). Thinly slice the white and light-green portions of the leeks, cross-ways, (you want skinny little Leek-O's). Set them aside.
  2. Thinly slice the onions. Again, you want a bunch of O's.
  3. Finely chop the garlic.
  4. Heat olive oil in a large, heavy pot over medium heat
  5. Add the onions, leeks and garlic to the hot oil. Cook on medium low, stirring just enough so that the onions start to cook, but not brown.
  6. While the onions are cooking, slice the mushrooms.
  7. Once the onions are limp and translucent, turn off the heat and add the sugar. Stir lightly and let 'em sweat for appx 5 minutes.
  8. Turn heat back up to medium-low and add the mushrooms. Saute 'til the mushrooms brown (but the onions should not).
  9. Stir in white cooking wine to deglaze the pan.
  10. Turn heat up to medium and add broth, bay leaves and appx half of the thyme. Bring to a gentle boil. Then reduce heat to simmer.
  11. Cover pot and simmer for appx 45-mins to an hour.
  12. Check it periodically. Taste test it. Add Flavor Boost (if desired), more thyme and a teeny bit of tarragon. Salt/pepper to your liking...
  13. Let it continue to cook. All told, I think I let mine simmer for an hour...
  14. Toward the end of cooking (appx last 10 mins), remove the bay leaves. Tthen add the feta cheese. Crumble it as small as you can, and let it simmer for a few. Hopefully it will *kinda* melt. If you still see big chunks, squish 'em against the side of the pan with the back of a wooden spoon.
  15. During the last 5 minutes of cooking, add red wine and let it cook-in.
  16. Add heavy cream and stir-in well.
  17. Serve and ENJOY!
This is actually a pretty "hearty" tasting soup. I think you could hit it with an immersion blender, if you were so inclined. It's almost like oniony cream-of-mushroom soup - only better!

I think it could also work, quite nicely, as a sauce base. Something you could pour over, say, a London Broil (although I'd add more tarragon for that).

Yeah - I'm pretty pleased with how it came out!

Now I hope it freezes well!

(I'll try to add a picture later!)


More Ramblings. Ceramics, Gardening, Misc...

So my yukky skin condition is still lingering, but it's starting to show miniscule signs of improvement ("I'll take it!").

At least, outwardly anyway, I look a bit less Reptilian. But the bottoms of my feet are still flaring up and it hurts like a Mo'Fo!

I hope it clears up by Friday - that's all I've got to say!

Friday, P and I are going to the San Francisco Garden Show in San Mateo. Turns out I lied in my last post, the Master Gardeners' Sale is the following weekend!.

Anyway, I'm sure there will be some "walking" to do (Eeek!). But hopefully, also, some Super-Cool Gardening ideas as well!

And I hope to come back all "pumped-up" and ready to tackle my Yard Chores with a vengeance! At the very least: clean-up my greenhouse to the point where I can store my Master-Gardener-Sale purchases (which will be abundant!!!).

Then on Saturday, we are going to a different ceramic studio to learn how to make clay birdhouses. I have a sneaking suspicion mine is gonna end up looking a bit more like a Tiki Hut!

Honestly, that's another reason I need my skin to clear up. Not sure if playing with mud is such a good idea when my hands are all foobar'd :::sigh:::

And Clay-Play while wearing gloves just ain't gonna cut it!

Our primary interest in the birdhouse workshop, actually, is to start checking out other studios in the area. P has her own Clay-House and kiln - but her kiln isn't hooked up (it's 220V and I don't think she's got a place to plug it in). She is still affiliated with the old studio, but is contemplating a possible move. So we basically just want to check this place out.

I recently canceled my membership at my last studio. It was a nice enough studio, but not really geared toward hand-building. And the firing schedule was kind of "hit-and-miss" (It's kind of sucky to give Christmas Presents in February!).

For wheel-throwing, it was pretty good: Lots of wheels and plenty of instruction available. And I really liked the wide variety of clays and glazes to choose from. But there really weren't any comfortable table/chair arrangements for sitting and sculpting and whatnot. Not really a complaint, mind you - just a simple fact.

And, other than P, I really didn't "resonate" with anybody there. But then again, I kinda view ceramic arts as a solitary, almost-therapeutic pastime - for me, anyway (On the other hand, since glazing kinda drives me nuts, I actually *do* like having someone around to talk-to/distract me when I'm doing that!)

To be honest, I really don't *need* to be associated with a studio, for the kind of stuff I do. And now that I have my own kiln, it became a waste of money because I was paying (a rather significant chunk-o-change) to maintain my membership - for resources that I never EVER used!

But... There are definitely some advantages to being linked to a studio: Social-interaction is one (if you're into that). Inspiration is another (it's cool to see other people's techniques and ideas). And access to a BIG kiln and other firing techniques is nice, too. And, in fact, someday - if I ever go back to making "big" pieces, I may HAVE to join a studio - just so I can fire 'em!

One thing that I would like access to is a Raku Kiln. I could probably build one myself (tons of resources on the web for that). But Raku firing is messy, smoky (and dangerous!) business - so if that's something I want to pursue in the future... Well....

Like I say, we're just using this opportunity to check out a different studio. And we may go look into others... We'll see!

For now, I am perfectly content with my li'l Tiki Shack and small-ish electric kiln.

Anyway, that's about all the News that's Fit to Print. Tonight, I am making a Leeky French Onion Soup with Mushrooms, that may evolve into something else. It's simmering on the stove now (and the scrumptious aroma is making my tummy rumble!). If it turns out to be stupendously delicious, I'll post the recipe.


Saturday, March 17, 2012

Recipe: Bendy Straws and Corn Chowder

Addendum 3/18: Okay, here is a picture of a Bendy Straw and Corn Chowder!


Okay, I got most of the "rambling" out of my system with that last post...

Butttt... There's a little more!

Years ago, when I lived on my boat, I developed some really cool friendships with some of my neighbors.

Boat-People are "Different" from the rest of the general population - a fact that I mused about on my original www.imqtpi.com website. We tend to be "loners" for the most part and don't necessarily want close-ties to others (and I can say "we" because I was one of 'em!). Yet at the same time, we were a very close-knit community (meaning: We watched out for each others' boats and/or if anyone "got into trouble" - we all pulled together to "make it right!").

Yes, we were a Tight-Knit Community of Loners - go figure!

One of my neighbors was *particularly* Hermit-Like and rarely ventured outside of her boat to interact with others. I'll call her "Miss-M."

Miss-M did a simply stupendous job of NOT getting sucked into ANY of the dock-drama. I, mostly, did too - but since I was more "interactive," I had a tougher time "avoiding" the drama - since there were ppl who wanted to drag me into "their side" of whatever was going on... (Although I like to think I did a damn-good job of staying out of it, for the most part!)

Anyway, this isn't about Dock Drama. This is about FOOD!

So Miss-M and I would venture out on a fairly regular basis and go out to lunch at various dining establishments in the area. We had AMAZINGLY bad luck with our Dining Adventures including encountering a McDonald's that had RUN OUT OF COKE (And Miss-M was, quite simply, a Coke-Addict) (and I *am* referring to Coca COLA - just to be clear!). And another occasion when we'd gone out for Pizza and the restaurant had RUN OUT OF CHEESE. No, I am not making this up!!!

It became, kind-of, a standing joke for us - to see what sort of OUTRAGEOUSNESS we'd encounter whenever we'd go out for food.

One of our "Semi-Regular" hang-outs was Mimi's Cafe - in Foster City/San Mateo. They were actually pretty reliable in the Quality (and Availability) of their food (and soft-drinks!). But two areas that were always iffy were: "Will they have Bendy Straws today?" (which is neither here nor there - but we found it amusing!) and "Will the Corn Chowder [one of their "Signature Items"] be thick and delicious?" "Or runny and not-so-good?" (which, to be fair, meant that the Corn Chowder was made fresh, daily).

Ever since then, whenever I encounter a restaurant that offers Bendy-Straws, I think of Miss-M.

And, in fact, the last time I was up at the marina (for BoatGuru John's "Memorial" party), I ran into Miss-M and insisted that we need to exchange phone#'s and hook-up for lunch again.

"Here, I'll call you from my cell, so you'll have my phone#. When you get the call, you can save my number. In fact, maybe you could label it as 'Bendy Straw!'" - But then I got to thinking that maybe having a phone# saved as "Bendy Straw" might be misconstrued as me being an Exotic Dancer (Hah!) or Hooker!

Annnnnnywaaaaaayyyyy.... I hadn't given it much thought since then. But while hubs and I were in San Diego (which, BTW, was where BoatGuru John ended up, and ultimately died - :::sigh:::), we had dinner at a restaurant called Oggi's (a place that John introduced us to). They did not have Bendy-Straws, but they *did* serve a damn-good Corn Chowder...

Hubs enjoyed it, so I said I would make some.

I then consulted Google and stumbled onto this: Mimi's Cafe Corn Chowder. Yippy-Freakin' -Skippy! It is THE Mimi's Corn Chowder Recipe, and if *I* make it, I can virtually guarantee that it will be thick and creamy and delicious! Annnnd... I have a more-than-adequate supply of Bendy Straws!

That said, here is the recipe, with my modifications:

(QT's Interpretation of) Mimi's Cafe Corn Chowder

(Serves 6)

Ingredients

  • 1/4 cup butter (1/2 stick)
  • 3 Tbs Flour
  • ¾ c onion, finely chopped
  • ¾ c diced celery
  • 2-1/2 c water
  • 2 c cubed, peeled potatoes (I used Yukon gold)
  • 1 package (16 oz) frozen corn krnels
  • 1 can (14 oz) cream-style corn
  • 2 carrots, shredded
  • 3 Tbs Splenda
  • Salt and White Pepper (to taste)
  • 2 c heavy whipping cream (unsweetened)
  • ½ bottle Moscato or other sweet white wine (I used half of a 187ml bottle)
  • (optional) 1 more Tbs of melted butter + 1 Tbs Flour to thicken it further, at the end.

Instructions:

  1. Melt butter in large saucepan over medium heat
  2. Add flour and whisk until smooth and a roux forms
  3. Add onions and celery. Saute until soft, but not browned.
  4. Add water, potatoes, corn kernels, creamed corn, carrots and Splenda
  5. Bring to a light boil
  6. Lower heat, cover and simmer ‘til potatoes are soft (appx 30 mins)
  7. Add cream and simmer, uncovered until thick and creamy. Season with salt and white pepper.
  8. If it doesn’t thicken to your liking, melt butter in a separate small pan and whisk in flour to create another roux. Slowly add roux to the soup, stirring constantly, until it reaches the desired consistency.

This is a delightfully tasty, mellow soup, and would make a good "base" for other things... Maybe add some fresh mushrooms (saute, at the beginning, with the onions and celery). And/or toss in some leftover chicken. And/or add some frozen peas. The possibilities are endless!

No pictures, unfortunately. When I did manage to make it (involved appx 30 minutes of standing over the stove, on my ouchy-feet!), I was soooo freaking starved that I scarfed 2 bowls down before I thought to snap a picture!


View my page on Meet the Phlockers