Okay, maybe a little bit of rambling! Been doing a fair amount of "Art Glass" dabbling - whenever I can find a Groupon for Bay Area Glass Institute (Love BAGI!).
One project that intrigued me was glass slumping. I have a kiln, so might as well try it!
Been thinking about it for a loooooong time - which is probably a good thing because it allowed me to "hoard" quite a few Skyy Vodka bottles in the garage!
Much web-surfing was done, and many bottles were hoarded.
A few sites with good info:
-Warm Glass
-Big Ceramic Store - I mostly followed this one
-Fused Glass - Quite a few simple projects here
If you Google glass-fusing and/or bottle-slumping, there is a ton of info out there.
I wanted to keep it simple, so I figured I'd start with bottle slumping. No need to worry about COE's and other "details" - just bake a bottle 'til it's flat.
And since my kiln is a ceramic kiln (as opposed to a glass kiln, which has more heating elements - including elements in the kiln-lid), I mostly stuck with the info from Big Ceramic Store. I started with one of their "recommended" firing profiles (but I tweaked it, a bit).
Okay, so anyway, here is what I did for my Very First Bottle Slump:
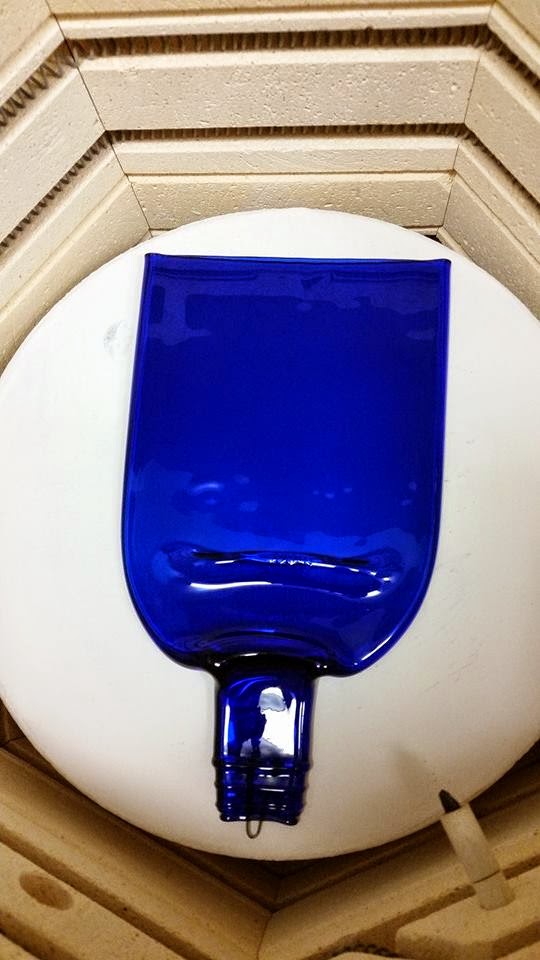
- I'm using 1.75 litre bottles, and the height of the bottle - laid on it's side - was pretty much *exactly* the diameter of my kiln shelf. This made me nervous because, as the bottle flattens, there's a strong possibility that it's gonna extend beyond the edges of my *round* shelves.
- As I was Googling "Bottle Slump" Images, I really didn't like the way the base of the bottle slumped upward, and flopped over.
- Being cognizant of #1 and #2, I decided to buy a bottle cutter from Amazon (Affiliate link - but I've yet to see a penny!) and sliced about an inch, to 1-1/2" off the bottom of the bottle - figuring I'd end up with a nice flat cheese-tray, and a nifty round disk that could be used as a trivet, or wall-hanging, or something.
So I have to say that - even though I was dubious of this cutter - it did a pretty good job of scoring the bottle properly on the first try! It was a little nerve-wracking to put together, and the included instructions were a little wonky, but it did the job!
Important hint: Do the boiling-water/ice-water dunk after scoring it. Mine broke off clean after about 3 dunks.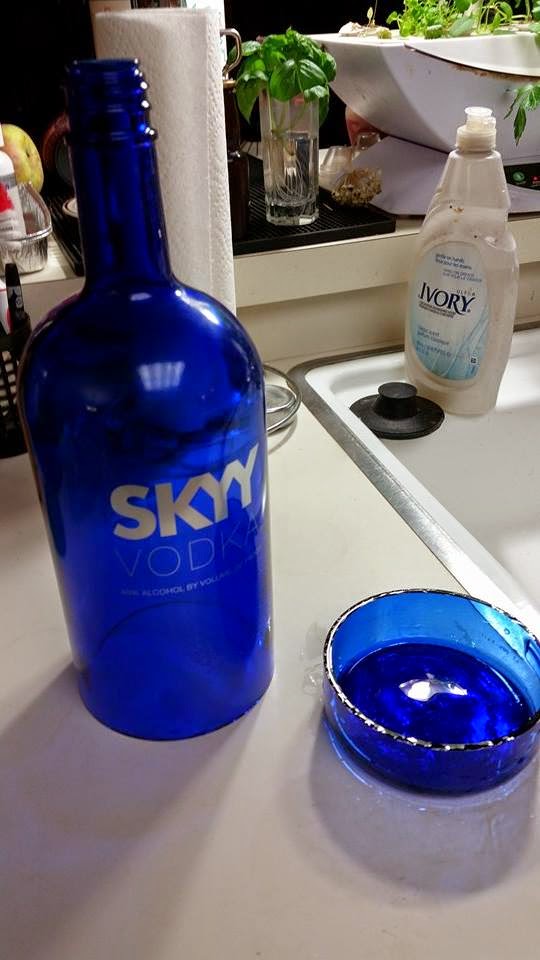
- Remove the labels from the bottle (no, they aren't painted-on, they're clear plastic labels that *will* turn black if you leave 'em on). Google has dozens of different suggestions for label-removal. I found that scraping the label off (after soaking in hot, soapy water), then hitting it with rubbing alcohol did a pretty-good job. Keep rinsing, drying, inspecting, re-alcoholing (lather, rinse, repeat) 'til you confirm you got ALL the residue off. You want NO adhesive residue and NO finger oils on the glass.
Add'l helpful hint: Remove the label *before* you cut the glass. That raw edge was kinda scary! I also wore Nitrile surgical gloves for the final cleaning and kiln-loading - so no finger-oils to smudge things up! - Prep the kiln shelves. I had previously slathered my kiln shelves with kiln wash from the local Clay shop - but much of it was flaking off. I chose my "smoothest" shelf, and mixed-up a fresh "light-slurry" of kiln wash and re-applied it. Then dried it with a propane torch, then attempted to smooth the surface using a green scruffy pad.
- Load the kiln. I knew I couldn't fit both the bottle and the base on one shelf, so I put the base on it's own shelf - toward the middle of the kiln (it didn't get as warm).
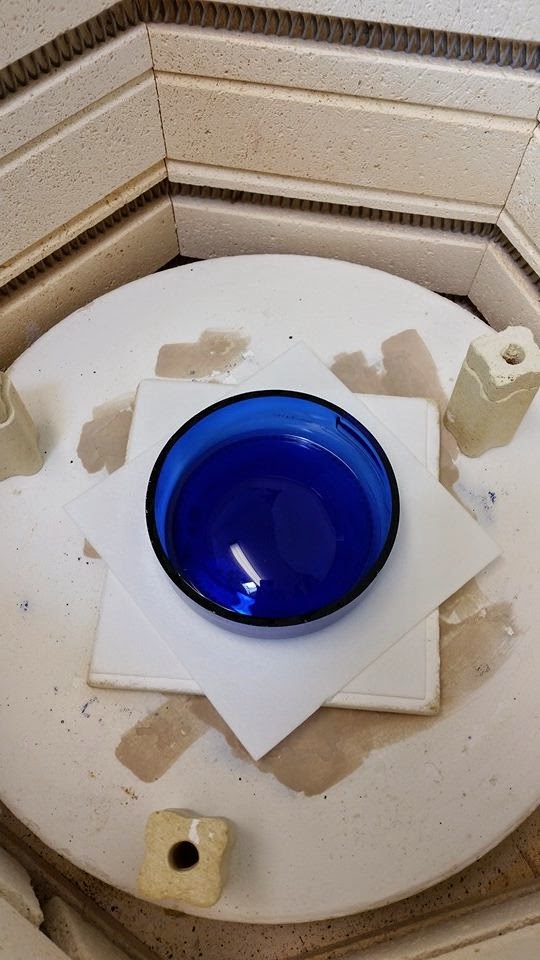
Okay, so I was *super* paranoid about squish-age and glass-running, so this is on 2 pieces of fiber-paper, *and* a mini kiln-shelf, *and* a regular kiln shelf (with extra kiln-wash splooged-on!) - Load the top shelf - leaving extra space at the "bottom" end of the bottle. Insert a high-fire-wire into the neck (optional - if you want to have a hanger).

- Program the kiln: I took one of Big Ceramic Store's profiles and added a couple extra segments - to include an annealing phase (annealing is where the glass is "held" at a high-ish temperature. It should prevent the glass from cracking from thermal shock during the cool-down).
- In case you're interested, this is the firing profile that I plugged-into the controller:5 120 750 10m4 500 970 20m3 300 1425 10m2 250 1300 0mSegm# Rate Degree Hold1 500 1100 10m
My kiln is an AIM model 1413/2 (runs on 2 x 120V, but will reach Cone 10), with a Bartlett V6-CF programmable controller. No clue what the capacity is, but definitely less than 3 cubic feet, I'm sure. Nevertheless, it's not a tiny kiln - there's a fair amount of "space" to heat-up in there...
BTW - I don't recommend this firing profile (for reasons described below). But I'm keeping copious notes and tweaking as I go. Eventually, I'll hit on the *Perfect* firing profile! - Run the kiln and try to find something else to occupy your mind for the 7+ hours it takes to cook (and another 5-6 + hours to cool-down!)
- Get impatient in the wee-hours of the morning, grab a flashlight and run out to the studio to sneak a peek! Then close it again and allow it to cool naturally!
Ooh! Ooh! Looks encouraging! - Wait til morning to get a GOOD look at it - and confirm that you don't have glass FUSED to the kiln shelves! (Yay! I didn't!)
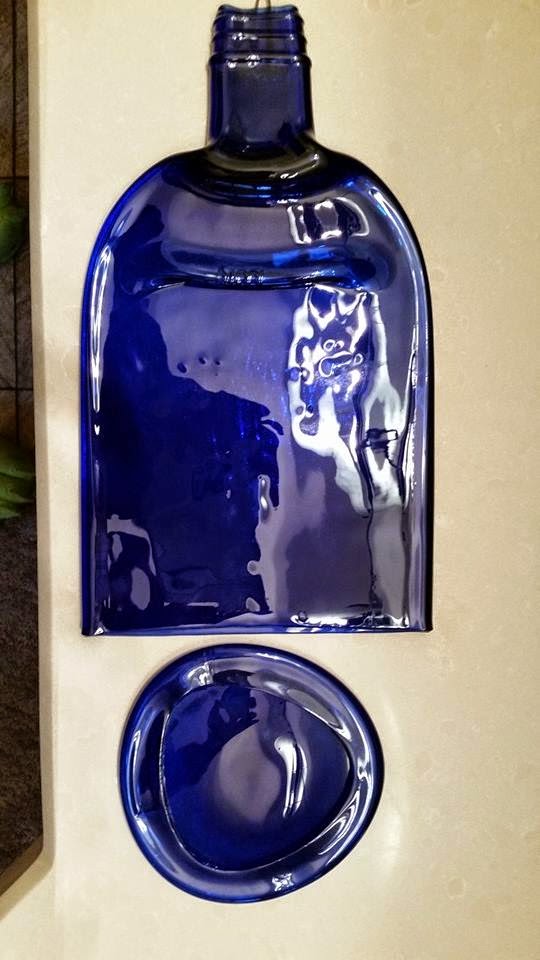
Indoor shot.

Bottom-side

(No, I have no idea why the picture placement is wacky!)
Top-side, in the sun.
Thoughts/Observations:
For this being my first attempt at slumping a bottle, I'm actually pretty happy. No, it's far from perfect - but I did err on the side of caution (better to have an under-slumped bottle than a ruined kiln!).
The bottle got more heat, so it slumped more - but not quite enough. I do like how the handle "folded" as it slumped (at the neck). I don't like the "fold" about 2/3 of the way up. Also, the bottom end (where the bottle was 'open') didn't really slump/seal together which would make me hesitant to sell this as a food-serving piece (No, I won't be selling this one!). Lastly, I did get some pesky air-bubbles (which can almost be seen in the sunshine shot). Not sure what I'm gonna do to prevent those.
I like how the base collapsed into a circle. I was afraid it would be more lopsided. The disk didn't get nearly as much heat as the bottle/cheese plate did. On the bottom-shot, you can see the circle-of-dots that were part of the original bottle - so this is grossly under-slumped.
Add'l note on the bottom-shot (of the bottle/cheese-plate), you can see the brush-strokes from the kiln-wash on the shelf.
Bottom Line: I think I need to increase the top-temp, and extend the "soak" at top-temp. I think my annealing phase was fine (segment 4 @ 970* for 20m).
This bottle is my prototype - and I plan to use it to create a ceramic-bisque mold for future slumps. I'll put an "edge" around the mold so that the outer edges of the cheese-plate will have a lip (I hate runaway cheese!). As for the disk, I may already have a round plate mold someplace. Although I think it might make a nice trivet, if I can figure out how to *easily* slump-it further (maybe epoxy some flat, clear marbles to the bottom?).
And I'll plan on mixing up my kiln-wash a little thinner, and using a spritzy-spray-bottle applicator - rather than a brush - so hopefully I'll get smoother coverage (resulting in a smoother bottom).
And I'll plan on mixing up my kiln-wash a little thinner, and using a spritzy-spray-bottle applicator - rather than a brush - so hopefully I'll get smoother coverage (resulting in a smoother bottom).
I have some other ideas I want to try out: Bought some "dichro-slides" which is dichroic (shimmery/rainbow) finish on a fusible decal. Once the bottle is fused flat, I'll apply the dichro-slides to the glass in some kinda cool pattern/design, then re-fire in the kiln to fuse 'em together. Not sure if that should be a "tack-fuse" or what. More research is needed...
In any event, I wanted to share "What I did" - in case anyone is interested (at the very least, I can reference back to this - next time I slump!). And *when* I do achieve a "Successful" bottle slump, I'll post the firing profile (with the requisite "YMMV" - since kiln performance may vary).
I'm actually quite happy with it - and feel encouraged enough to try more :-)


1 comment:
This article gives the light in which we can observe the reality. This is very nice one and gives indepth information. Thanks for this nice article.
RS Glass bottle
Post a Comment